Bio je avgust 1999. Doselio sam se sa porodicom u Beograd. Završio sam prethodno treći razred gimnazije prirodno-matematičkog smera, i prva bitna stvar u Beogradu je bila da nađem novu školu.
Odlazim sa ocem u Treću gimnaziju, tamo nam se direktor izvinjava, kaže da imaju previše učenika, pokazuje male učionice.
Odlazimo u Jedanaestu gimnaziju, tamo direktorka priča istu priču i onda kaže “Idi ti u šestu, tamo sigurno ima mesta”.
Raspitujemo se kod rodbine za lokaciju Šeste gimnazije, stižemo ispred, i na zgradi vidimo ogromni grafit: “Supersonična je šesta”. Tata kaže, e ova.. ova će ti biti dobra.
Ulazimo unutra, direktor nas prima, naravno mesta ima, ostavljam podatke, daje mi broj učionice, odeljenje i poželi dobrodošlicu.
Prvi septembar. Ja stigao malo ranije. Nije mi prvi put da sam novi u školi. Znam već fazone kako se upoznati i uklopiti. Đaci polako pristižu, upoznajemo se.. standardna priča.. odakle dolaziš, kakav si đak, kakvu muziku slušaš, kako igraš fudbal..
Kreće prvi čas, razredna, srpski jezik... vidim fina neka žena, opuštena atmosfera, đaci dosta pričaju.. ljudi oko mene pričaju sa mnom.. u jednom trenutku razredna se okreće i kaže... ej ti, novi, mnogo pričaš, ajd izađi napolje.. đaci kreću da negoduju... nemojte razredna.. ja ustajem i izlazim.. čekam ispred vrata da se čas završi. Nije mi prvi put ni da me izbace napolje.. nema ljutnje, pričao sam.. žena je stvarno dobra, vidim da joj malo izmiče disciplina, pa trenira strogoću na meni, a novi sam, pa mi je to skroz ok.
Posle časa se vraćam unutra i vidim da se nešto dešava... svi napeti... nešto su saznali na času.. čujem samo Joca... Joca... peticija..
Neki papir kreću da pronose po razredu... svi se potpisuju... pitam šta se dešava? Kažu... promenili su nam profesora za matu... sad nam predaje Joca ubica!
OK.. razmišljam... bio sam u dosta različitih škola.. čuo desetine nadimaka za profesore... nadimak ubica još nikad nisam čuo, ali... kakav li je to sad lik kad ga se tako boje svi, a nije im nikad predavao... Papir dolazi do mene... razmišljam... u prethodnoj školi kad je bilo glasanje da se smeni profesor fizike, sa drugom sam jedini bio protiv, iako sam imao 3 iz fizike.. tako da nisam nešto za te varijante, ali nov sam... da ne talasam sad... potpišem se. Neki od najglasnijih đaka odnose papir kod direktora.. ostatak dana prolazi fino... svi srećni što su smenili ubicu.. Ja se upoznajem sa celim razredom..
Dan drugi. Čas matematike. Ulazi kratko ošišan lik u polo majici. U jednoj ruci nosi dnevnik, a u drugoj neki papir. Kaže nešto u fazonu... ooo, dobar dan deco.. nismo se još ni upoznali, a vidim već hoćete da me se rešite.. Joca!
Kreće da čita imena sa onog papira... za svakog od nas pita koju smo ocenu imali iz matematike i zašto hoćemo da ga smenimo... dolazi do mene.. Ja kažem da sam nov, da sam imao četvorku u prethodnoj školi... on nešto šaljivo prokomentarisa na temu što sam tek došao a već hoću da menjam nastavnike.. ja se nasmejah..
Dani prolaze, meni se škola sviđa.. ekipa u razredu je dobra... igramo dobar fudbal na fizičkom.. imamo jednog vrhunskog igrača, par nas solidnih.. sve u svemu dobra ekipa.. možda možemo i da uradimo nešto na školskom turniru.. Profesori kao u bilo kojoj školi... ima zanimljivih, ima smotanih, ima bizarnih, ima predanih poslu.. bukvalno kao u bilo kojoj drugoj školi.
To je inače bila prva školska godina posle bombardovanja, tako da je u prvih mesec dana svaki nastavnik imao obavezu da prođe gradivo iz dela drugog polugodišta prethodnog razreda, jer tada nismo išli u školu.. sve u svemu, bilo je dosta žurbe i kod njih da se pređe staro gradivo i počne sa novim..
Dolazi prvi kontrolni iz matematike... Stižu rezultati... Par trojki, nešto dvojki i mnogo jedinica. Tad smo skapirali zašto čoveka zovu ubica. Od mogućih 100 poena, potrebno je 38 za dvojku. Ja sam dobio trojku.
Kasnije sam skapirao šta je suštinski problem... ja sam imao sreće da sam u Gimnaziji u Vršcu imao prof. Lekić Petrovič, koja je ozbiljno znala matematiku i što je bitnije, umela da prenese to znanje i održi disciplinu na času. Razred u Šestoj, u koji sam došao nije bio te sreće... imali su više različitih profesora mate u ranijim godinama, a u prethodnoj godini neku, koliko se sećam da su rekli, ne baš zainteresovanu osobu, kod koje su mogli da se provlače bez mnogo učenja... a matematika ne prašta... jednom propušteno se nadoknađuje samo uz mnogo rada.
Potom smo imali još mnogo, mnogo kontrolnih i pismenih zadataka kod njega.
Sećam se situacije, Joca diktira zadatke... neko od ekipe koja je sedela oko mene me nešto pita.. ja odgovorim.. Joca čuje i kaže mi... Tomić.. piši minus pet! Ja kažem.. ali profesore, nisam.. Joca... minus deset... Ja... ali profesore, nis.. minus petnaest! Ja dižem ruku, razumeo! Na papir za kontrolni upisujem -15. Dolaze rezultati, ja skupio valjda nekih 50ak poena... on sve lepo izračunao, zaokružio na papiru onih -15, oduzeo i dao mi keca. Zasluženo :)
U drugom polugodištu se desila slična situacija, ali sam bio malo pametniji i upisao “- mnogo” na papir, tako da sam prošao bez oduzimanja poena.
Bilo je, naravno, i mnogo primera ljudi koji su stvarno dosta radili.. vežbali matematiku danima i mesecima, ali su rupe u znanju bile tolike da nikako nisu mogli da prebace 38 poena. A imali smo stvarno dosta kontrolnih i pismenih zadataka. Na samom kraju je, čini mi se, manje od 10 ljudi išlo na popravni kod njega. Praktično svako, ko je barem jednom dobio dvojku, je imao 2 na kraju. Svi su kasnije položili popravni ispit i niko nije ponavljao.
Iz učeničke perspektive neke stvari možda izgledaju strašno u trenutku kada se dešavaju. Ali sve je to deo procesa školovanja. U školi se ne uči samo gradivo. To je priprema za život. I moje mišljenje je da nas je Joca dobro pripremao. Koliko je bilo u njegovoj moći.
Ja sam u nekom trenutku tokom te godine konačno odlučio šta ću da studiram. Znao sam da ću polagati matematiku na prijemnom ispitu, i trudio se da istu što više vežbam. Na kraju sam uzeo i maturski rad kod Joce, iako su mi mnogi govorili da sam blesav i da treba da uzmem nešto prosto, da ne trošim puno vremena na to. Rezultat je bio da sam imao 4 iz matematike, dobio 4 na maturskom radu, i uz Jocine besplatne dodatne časove u školi, spremio prijemni i upao na budžet bez bilo kakvih dodatnih privatnih časova.
Posle toga ga nikada više nisam video. Povremeno je bilo vesti po novinama i kasnije društvenim mrežama, o nekim suspenzijama, procesima i sl. protiv njega. Bio je tu i tamo u nekim emisijama na TV-u, youtube-u.. Pratio sam tu i tamo sa strane šta se dešavalo sa njim, kao i ovog poslednjeg puta. Znao sam uvek da se tu radi o nekoj grupi zbunjene dece, kao što smo i mi biil tog 1. septembra 1999, kad smo pisali peticiju protiv njega. Dece koja u tom trenutku ne mogu da znaju šta je dobro za njih na dugi rok. Dece koja, ponekad uz pomoć roditelja, pokušavaju da idu linijom manjeg otpora. I znao sam da nasuprot njih stoji jedan principijelan i čvrst čovek, koji se trudi da tu decu usmeri na pravi put. Put koji sigurno vodi ka više znanja, boljem obrazovanju, i kasnije lepšem životu.
Danas je Joca sahranjen.
Ja trenutno živim daleko, i nisam bio u prilici da odem na sahranu, a znam da se dosta bivših đaka pojavilo na groblju. Ovaj tekst je bio moj način da se oprostim od dobrog profesora.
P.S.
Po društvenim mrežama je poslednjih dana bilo dosta komentara u stilu.. “ubili su ga”.. “oterali su ga u grob”.. na račun roditelja dece koja su podigla poslednju tužbu protiv njega.. ali ja se nikako ne bih složio sa tim.. Prevelika je Joca bio faca da bi ga jedna suspenzija ubila.
Tuesday, January 24, 2023
Thursday, July 16, 2020
Modern SharePoint story
John, a complete beginner: Wow, this is great... I can create a responsive, fancy list with shiny form and save the items there! Woohoo!
John, after two hours of experience: This is nice... I can add more different columns! We should recreate our old Excel application here!
John, after five hours of experience: Great, I can add another list and connect them both with lookup columns! It will be easy to recreate our old Excel file! Let's do it guys!
John, after one day of experience: Hmm... these formulas work, but... it is strange that we cannot reference other rows in formulas... This was easy in Excel...
John, after three days of experience: Ok, so this doesn't work, but ok, we don't need it anyway. But hey, we can change the color of our cells in the list! That's something!
John, after five days of experience: Ok, so we have removed some features that we had in the old Excel file. That's not a problem. We can live without it. This PowerApps thing is promising... I can easily create forms. Let's recreate our VBA forms from the old Excel file here.
John, after 8 days of experience: Ok, we can move the fields around, change colors, change fonts, we can connect to hundreds of external systems, we can even tweet from the form, but it looks like we cannot write this piece of business logic here... hmm.. there must be some way around...
John, after 10 days of experience: Ok, I got this. We need an Azure subscription to be able to deploy our Azure Function that will contain the business logic code. We will then call it from the form... I’ll ping Steve to help with this...
John, after 14 days of experience: Ok, I need to create an item in the third list after the value in this field changes from A to B. Ok, let's google this... Hmm... Stackoverflow says that there is some Flow thing that can be used here... Hmm... strange... they call it Power Automate on Microsoft's site... let's try it...
John, after 20 days of experience: Ok, let's try something else! Oh, it looks like there is something called SharePoint designer and a thing called SharePoint 2010 Workflow... it has exactly what I need. This is easy. I'll just create a workflow, add this action and create an item in the third list. Easy peasy!
John, after 20.2 days of experience: It would be good if I could send an email to Pete after an item is created in the third list. Let's try this Flow thing again, they say it's modern, so it must be good!
John, after 21 days of experience: Hmm, this looks fine, but it always sends an email from my account... Why can't it send it as some generic user? Hmm, it looks like this can again be done with this SharePoint designer workflow thing. Let's use it. It rocks.
John, after 21.5 days of experience: It would be good if we could create a task for Mike after an item is added to the list, so he can check it, set additional fields and approve it, just like in the old Excel file.
John, after 21.8 days of experience: Wow, this Planner thing looks promising! It has fancy colors, fancy design... wow, look at these shiny charts! I'm impressed. It's like trello, just shinier! Let's use it. Ok, I'll finally be able to use Flow, after an item is created in the list I'll create a task in Planner for Mike and he will get an email! Great!
Items are automatically being added to another list...
Pete receives emails whenever necessary...
Mike gets his tasks...
Everyone is happy...
Everything runs nicely, with sporadic, minor issues... until...
John, on day x: Hmm, it looks like there's some problem with this Flow thing... it doesn't run every time after an item is created... let's google this... oh, it looks like my plan has some limits... we need to buy a new subscription...
John, on day y: Hmm, it looks like there's some problem with this list... some strange limit... let's google this... oh... the list contains more than 5000 items and that's the problem... but this worked fine in our old Excel file!!! Let’s call Steve, he will know how to fix this...
John, on day z: Let's check some SharePoint related news... let's check which new, useful things will be available soon... Oh, what is this? Microsoft will retire SharePoint workflows 2010. Hmm, that must be something old... something that nobody is using anymore... not interesting... let's check some Corona news instead...
November 9th 2020: Hmm, it looks like Pete is not receiving the emails anymore... Why did this suddenly stop working? Let’s call Steve, he'll know how to fix this...
If you want to help John not to be on Steve’s shooting list after November 1st, you can vote here. Fingers crossed!
If you are the Steve in your company there’s not much help for you whatsoever... But, in case you need to prepare for November 1st, check out this page. It can help you to identify all the workflows created by Johns.
John, after two hours of experience: This is nice... I can add more different columns! We should recreate our old Excel application here!
John, after five hours of experience: Great, I can add another list and connect them both with lookup columns! It will be easy to recreate our old Excel file! Let's do it guys!
John, after one day of experience: Hmm... these formulas work, but... it is strange that we cannot reference other rows in formulas... This was easy in Excel...
John, after three days of experience: Ok, so this doesn't work, but ok, we don't need it anyway. But hey, we can change the color of our cells in the list! That's something!
John, after five days of experience: Ok, so we have removed some features that we had in the old Excel file. That's not a problem. We can live without it. This PowerApps thing is promising... I can easily create forms. Let's recreate our VBA forms from the old Excel file here.
John, after 8 days of experience: Ok, we can move the fields around, change colors, change fonts, we can connect to hundreds of external systems, we can even tweet from the form, but it looks like we cannot write this piece of business logic here... hmm.. there must be some way around...
John, after 10 days of experience: Ok, I got this. We need an Azure subscription to be able to deploy our Azure Function that will contain the business logic code. We will then call it from the form... I’ll ping Steve to help with this...
John, after 14 days of experience: Ok, I need to create an item in the third list after the value in this field changes from A to B. Ok, let's google this... Hmm... Stackoverflow says that there is some Flow thing that can be used here... Hmm... strange... they call it Power Automate on Microsoft's site... let's try it...
John, after 20 days of experience: Ok, let's try something else! Oh, it looks like there is something called SharePoint designer and a thing called SharePoint 2010 Workflow... it has exactly what I need. This is easy. I'll just create a workflow, add this action and create an item in the third list. Easy peasy!
John, after 20.2 days of experience: It would be good if I could send an email to Pete after an item is created in the third list. Let's try this Flow thing again, they say it's modern, so it must be good!
John, after 21 days of experience: Hmm, this looks fine, but it always sends an email from my account... Why can't it send it as some generic user? Hmm, it looks like this can again be done with this SharePoint designer workflow thing. Let's use it. It rocks.
John, after 21.5 days of experience: It would be good if we could create a task for Mike after an item is added to the list, so he can check it, set additional fields and approve it, just like in the old Excel file.
John, after 21.8 days of experience: Wow, this Planner thing looks promising! It has fancy colors, fancy design... wow, look at these shiny charts! I'm impressed. It's like trello, just shinier! Let's use it. Ok, I'll finally be able to use Flow, after an item is created in the list I'll create a task in Planner for Mike and he will get an email! Great!
John, after 23 days of experience: Hmm, it looks like we can't have additional fields in Planner tasks... That's too bad... we were able to implement that in our old Excel file... But ok, we can live without it. Mike will just complete the task and we can later see some statistics in this fancy chart.
Production starts
Users are adding items, changing items, sharing items...Items are automatically being added to another list...
Pete receives emails whenever necessary...
Mike gets his tasks...
Everyone is happy...
Everything runs nicely, with sporadic, minor issues... until...
John, on day x: Hmm, it looks like there's some problem with this Flow thing... it doesn't run every time after an item is created... let's google this... oh, it looks like my plan has some limits... we need to buy a new subscription...
John, on day y: Hmm, it looks like there's some problem with this list... some strange limit... let's google this... oh... the list contains more than 5000 items and that's the problem... but this worked fine in our old Excel file!!! Let’s call Steve, he will know how to fix this...
John, on day z: Let's check some SharePoint related news... let's check which new, useful things will be available soon... Oh, what is this? Microsoft will retire SharePoint workflows 2010. Hmm, that must be something old... something that nobody is using anymore... not interesting... let's check some Corona news instead...
And then... November comes...
November 3rd 2020: Hmm, it looks like the items are not added to the third list anymore... Why is this happening? This has always worked fine... Let’s call Steve, he will know how to fix this...
November 9th 2020: Hmm, it looks like Pete is not receiving the emails anymore... Why did this suddenly stop working? Let’s call Steve, he'll know how to fix this...
Conclusion
All characters appearing in this story are fictional. Any resemblance to real persons is intentional!
If you want to help Mike to be able to create additional fields in his planner tasks, you can vote here.
If you want to help John not to be on Steve’s shooting list after November 1st, you can vote here. Fingers crossed!
If you are the Steve in your company there’s not much help for you whatsoever... But, in case you need to prepare for November 1st, check out this page. It can help you to identify all the workflows created by Johns.
And Pete... he doesn’t need help... he just receives emails...
Wednesday, July 08, 2020
SharePoint online - Get details of all SP Designer workflows
Microsoft has recently announced that SharePoint 2010 Workflows will be retired soon in the SharePoint online.
I personally think that the decision to remove a feature that is used a lot in production environments, with less than 4 months notice, during the corona crisis and summer vacations is totally not fair to the clients. Adding the fact that some of the functionalities SharePoint 2010 workflows offer don't have a proper replacement in the rest of MS services makes it unacceptable!
There is a UserVoice where you can vote that Microsoft postpones this date, so hopefuly there's somebody there who will listen to the community and give our clients more time for this.
Either way, we will need to prepare for the change, whenever it comes, and first thing that we need to do is to identify all the SP Designer Workflows that exist in our environments. In this post I will show how this can be done using SPCoder application.
SPCoder
First thing you need to do is get the latest version of SPCoder, either by downloading the zip package or getting the code from GitHub repo and building it yourself. You can also check out the SPCoder installation page for more details.
Then, run the SPCoder.exe, connect to your SharePoint online site collection using "SharePoint CSOM connector" and to the Github repo that contains the SPCoder scripts using "Github connector".

After that, expand the Scripts\SharePoint\SPWorkflowsGetter.csx file,
open its content in SPCoder and execute the code by pressing "Execute (F5)" button.
With this we have registered the plugin for getting all workflows. If you want to register it automatically the next time SPCoder runs, you can save it in your SPCoder's Scripts\CSharp\Plugins directory.
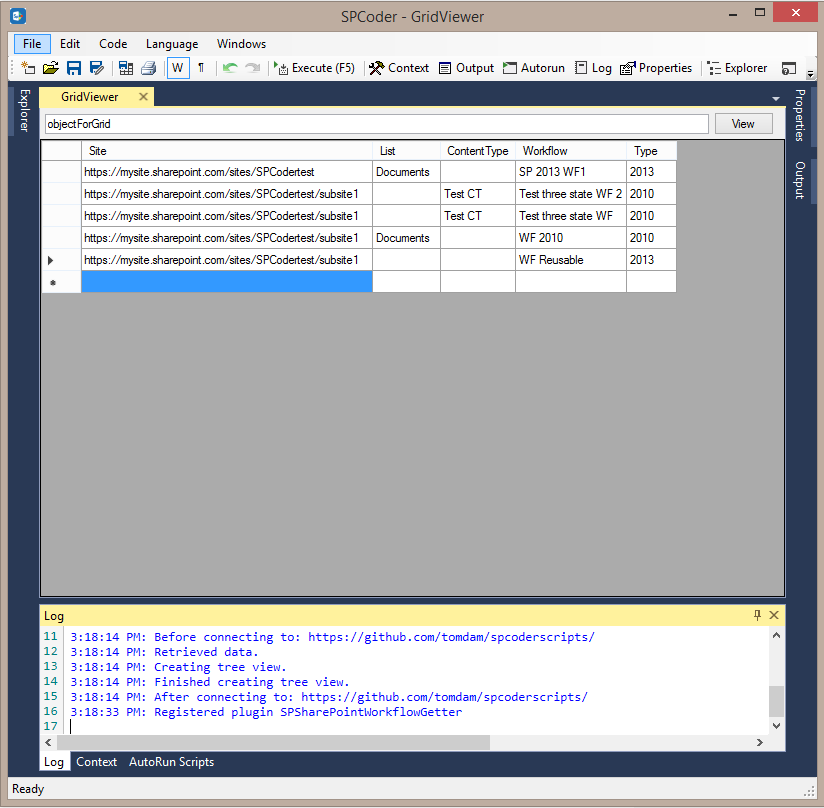
Next thing we need to do is find the site we want to check in SPCoder Explorer view, right click it and choose the "Get Workflows" option.

That option will activate the plugin, get all the workflows (both 2010 and 2013) from all the subsites and display the grid with the results afterwards.
The time needed for this operation to finish depends on the number of the subsites, lists, libraries and content types in your site collection, so if you have a lot of those, please wait until it finishes.
As you can see from the screenshot above, the report will show you the site url, the list title in case the workflow is related to a list or library, the content type name in case the workflow is related to a content type and both List and ContentType columns will be empty in case of a reusable site workflow. There is also a Type column which tells you if the workflow is 2010 or 2013.
This report should be a good starting point for you to plan the restructuring of your environment and finding a way to replace your workflows with some alternatives.
Thursday, July 02, 2020
Generate a maze in C#
There are many alghoritms for maze generation out there. The wikipedia page gives some nice overview. Some people blogged a lot about mazes and even wrote a book about maze generation!
While playing with C# scripting in SPCoder, I implemented the recursive backtracking algorithm for maze generation in C#. SPCoder's log window is used to display the generated maze and it was a perfect fit for this task.
There are two versions of the algorithm, one that generates a maze and displays it and the other one that stores all the maze versions during the generation and then displays animation where you can see the steps that algorithm took to generate the maze.
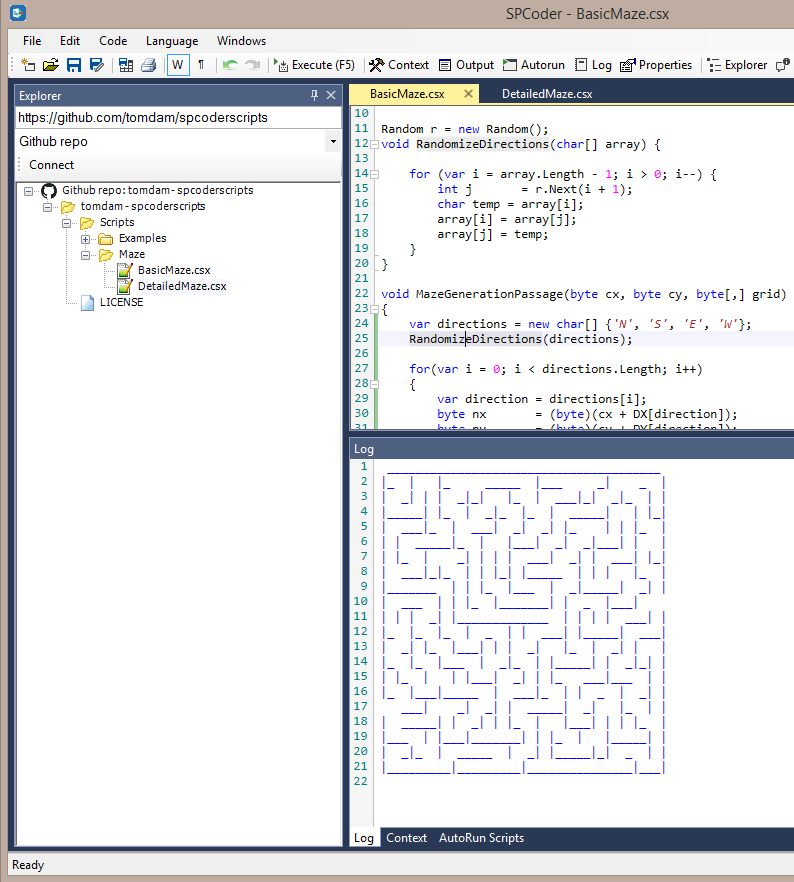 |
| SPCoder with Basic maze script loaded |
 |
| SPCoder log window that displays animation generated by Detailed maze example |
All you need to do to try it out is get the latest version of SPCoder, either by downloading the zip package or getting the code from GitHub repo and building it yourself, run it, load maze examples and execute them.
Maze implementation is stored in separate GitHub repo, which will in future contain all new SPCoder scripts. You can use SPCoder GitHub repo connector, connect to https://github.com/tomdam/spcoderscripts and load the BasicMaze.csx and DetailedMaze.csx in SPCoder (as shown on first screenshot). Or you can copy the code directly to SPCoder code window from BasicMaze.csx and DetailedMaze.csx.
Tuesday, June 30, 2020
Execute C# DotNetPerls examples in SPCoder
For years the website www.dotnetperls.com has been a very good resource for learning different programming languages. It is completely based on clearly described code examples and contains pages for different subjects (keywords, types, programming constructs, etc.) interlinked with other related topics.
The site is useful not only to beginners, but also to more experienced developers, because it contains examples with tips & tricks on many subjects, from basic to advanced ones. Personally, it saved me a lot of time with RegEx and DateTime formatting C# examples a couple of times.
Since SPCoder is a tool for writing and executing the C# code, and it supports creation of custom connectors which can connect to any datasource, I've written the DotNetPerls C# connector, which parses the C# examples from the site and makes it easy to open (and execute) them in SPCoder.
Connecting to DotNetPerls site
All you need to do to try it out is get the latest version of SPCoder, either by downloading the zip package or getting the code from GitHub repo and building it yourself, run it and make connection using DotNetPerls C# connector. After successful connection, the SPCoder's Explorer window will show the treeview with DotNetPerls C# pages and code examples.

You can then find the code example you want to see, right-click it and use the View Code menu item to open the source code in SPCoder's Code window.
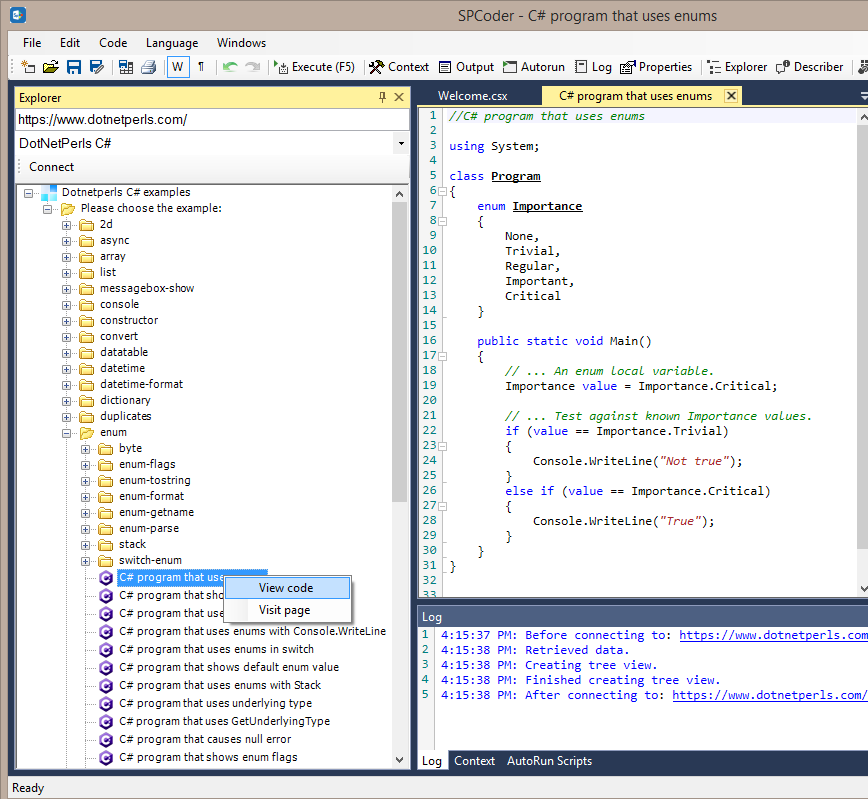
Every code example in the treeview also has the Visit page menu item which will, if you use it, open the browser with exact page where the code is taken from. If you would use the same item as on the screenshot above, that page would be https://www.dotnetperls.com/enum
Executing the code
Once you open the code in code window, you can execute it by either pressing F5 on keyboard or clicking the Execute (F5) button.
If we execute the code sample from our previous screenshot, the output window will contain the result of a Console.WriteLine() call.

Using other SPCoder helper windows
Additional benefit of executing the code examples in SPCoder instead of creating separate Console applications in Visual Studio is that you can execute the code part by part and even use other SPCoder windows to examine the variables and see what is really going on there. For instance, you can open the C# program that uses DataTable (located under datatable topic), and select and execute only the content of the GetTable() method (also selected on the screenshot below).

After that, you can use the GridViewer window to check the content of the table variable

You can also use SPCoder Describer and Properties viewer windows to further explore the variables and learn more about their data types.
Conclusion
In this blog post we saw how SPCoder can be used to connect to a custom datasource (web site) and how content from that datasource can be used with different parts of SPCoder. For the source code of the connector, check out the GitHub repo.
Wednesday, June 24, 2020
Run C# script files in Azure WebJob
Azure WebJobs can be used to run background tasks (programs or scripts) in the cloud. You can write your code for WebJob in one of several available languages. Official documentation states that the following file types are supported:
- .cmd, .bat, .exe (Windows cmd)
- .ps1 (PowerShell)
- .sh (Bash)
- .php (PHP)
- .py (Python)
- .js (Node.js)
- .jar (Java)
C# support
All .NET languages are supported and C# among them. If you write your code in C#, you can compile it to .exe console application and you will be able to run it as Azure WebJob.
What is currently not supported out of the box, is running C# script (.csx) files as Azure WebJobs.
While developing the SPCoder, I needed a way to run C# script files as background tasks using Windows Task Scheduler, so I implemented SPCoder.RunnerApp helper console application, which can be configured to run one or more .csx files. The same application can also be deployed to Azure and run as WebJob.
In this post I'll try to explain the steps on how SPCoder.RunnerApp can be deployed to Azure as WebJob and how you can later update just your script files, without the need for redeploying the SPCoder.RunnerApp application package again.
Getting the SPCoder.RunnerApp
In order to get the SPCoder.RunnerApp you need to either download the compiled package or clone the github repo and build the package yourself.

After you get the application, you need to write your business logic code. SPCoder.RunnerApp by default runs the Code\init.csx file. If necessary, you can change that setting in SPCoder.RunnerApp.exe.config file, by changing the CodePath app setting:
<add key="CodePath" value="Code\init.csx" />
The recommended way of organizing your code is to use init.csx only for adding necessary assembly references using the #r directive and registering other csx files for execution.
#r "System.Data"
#r "{{WorkingDirectory}}\mycustomlibrary.dll"
//...

//....
//here you can prepare all the csx files that should be executed
string folder = @"Code\";
FilesRegisteredForExecution.Add(folder + "code.csx");

//FilesRegisteredForExecution.Add(folder + "code1.csx");
//FilesRegisteredForExecution.Add(folder + "code2.csx");
//....
In the code above you can see the {{WorkingDirectory}} placeholder, which will be replaced with current working directory before execution.
If you follow the recommendations, your business logic code should be located in file Code\code.csx. The default implementation has only one line which calls Console.WriteLine(); method. There you can write your useful code. You can use any tool for writing the code.
Creating the WebJob
First, you need to register for an Azure account and
create an Azure AppService. I won't cover the steps for that here,
since there are a lot of resources available online.
After you write the code you can test it by simply running SPCoder.RunnerApp.exe application. When you're sure that the code is finished, you can pack the whole folder to zip file and upload it to Azure.

For all the available options related to WebJobs please check the beforementioned official documentation.
Running the WebJob
After running the WebJob you can check its log for the details, and this is the sample log after running the default implementation:
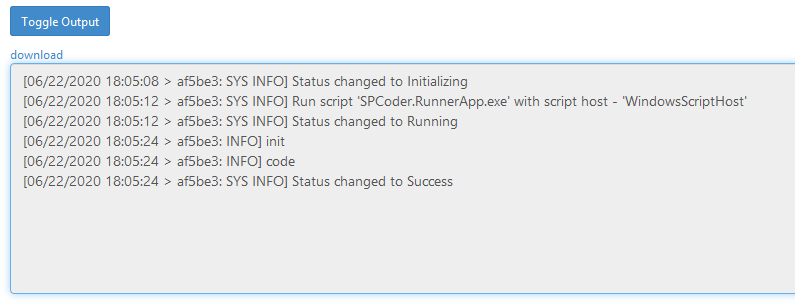
You can notice the two INFO entries, which were caused by the Console.WriteLine calls in our .csx files.
Updating the csx files
If you need to tweek your csx files after deployment, you can do it directly in the browser using the Kudu tools. The page where you can do that is located here: https://{YOURAPPSERVICENAME}.scm.azurewebsites.net/DebugConsole

After you click the Edit icon next to the file name, you will get the following screen, where you can paste your updated code.

Immediately after you save the code it will become available for the next execution of your WebJob.
Conclusion
This post explains how you can run your C# code writen in csx script files in the Azure cloud, without having to compile it to exe file. The same package can be run with Windows Task Scheduler on a windows machine outside of Azure.
For more information on the SPCoder application, SPCoder.RunnerApp and other modules, please check the GitHub wiki documentation.
Monday, June 22, 2020
Corona can even spread to SharePoint - with C#
I've used SPCoder, (the tool for writing and executing C# code, that I had developed) to import Coronavirus data to SharePoint.
The idea is to get the data from the page that tracks the daily Coronavirus updates in the world:
 |
| Worldometer's COVID-19 data |
Then, create a SharePoint list in SharePoint Online site and insert the coronavirus data to it:
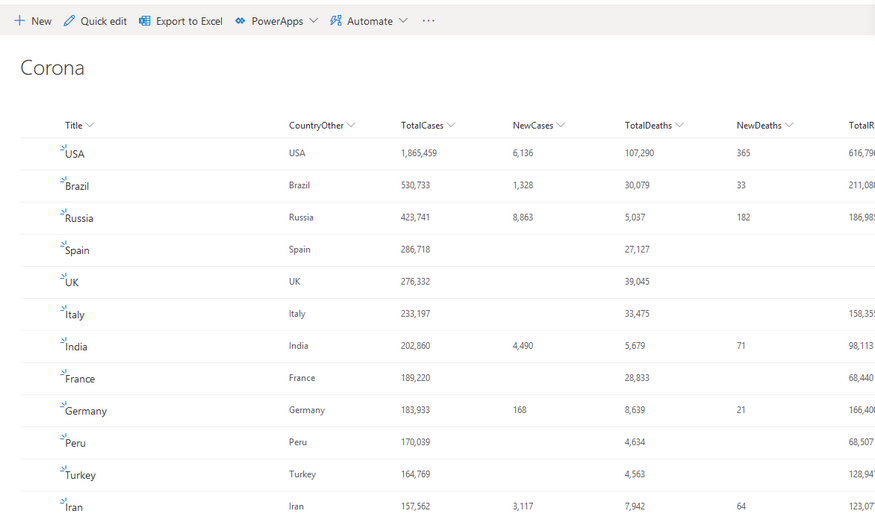 |
| SharePoint list with data from Worldometer site |
And finally, create a SharePoint modern page, insert a chart webpart to it and show a pie-chart with coronavirus data:
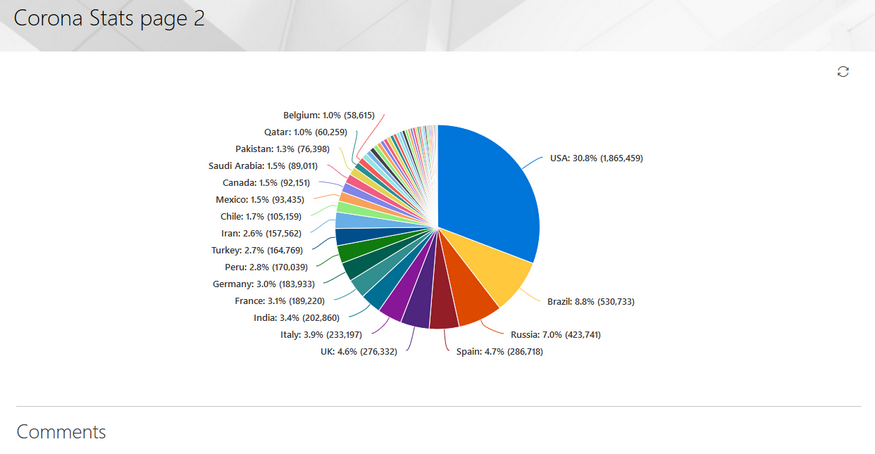 |
| SharePoint modern page - pie chart with coronavirus data |
The code and explanation are also available on GitHub wiki page.
//Get the data using "Web page" connector
main.Connect("https://www.worldometers.info/coronavirus/#countries", "Web page");

//Get the table of latest infromation about the corona virus in the different countries
//------------

//here we use the HtmlAgilityPack project (https://html-agility-pack.net/)
//to scrape the page and get the html table element that contains the data

var htmlnode = htmldocument.DocumentNode;
var htmltable = htmlnode.SelectSingleNode("//table[@id='main_table_countries_today']");
var thnodes = htmltable.SelectSingleNode("thead").SelectNodes(".//th");

var tbodyNode = htmltable.SelectSingleNode("(tbody)[1]");
var nodes     = tbodyNode.SelectNodes("tr[not(contains(@class,'row_continent'))]");

//create the DataTable object
var table = new DataTable("Corona");

var headers = thnodes.Select(th => th.InnerText.Trim()
    .Replace("\n","")
    .Replace(","," ")
    .Replace(" "," ")
    .Replace("/"," per "))
.ToList();

//create the columns in DataTable
foreach (var header in headers)
{
    table.Columns.Add(header);
}

//get the rows from html table and clean some of the values
var rows = nodes.Skip(1).Select(tr => tr
    .Elements("td")
    .Select(td => td.InnerText.Trim()
                    .Replace(",","")
                    .Replace("N/A","")
                    .Replace("+",""))
    .ToArray());

//add the rows to the DataTable
foreach (var row in rows)
{
    table.Rows.Add(row);
}
//------------
After executing the previous part of the code, the coronavirus details are scraped from the web page and stored in DataTable variable called "table". You can open GridViewer in SPCoder, and inspect the variable:
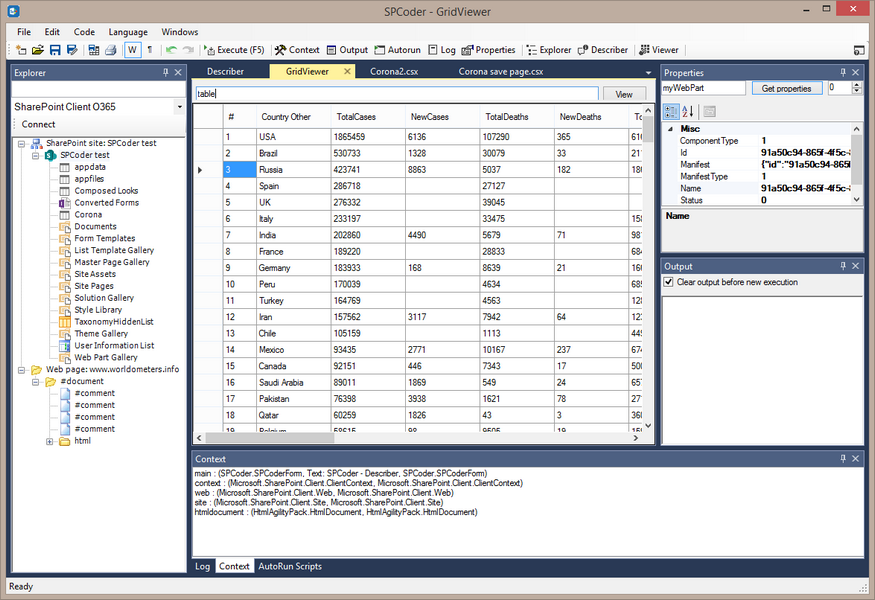 |
| SPCoder GridView window showing the scraped data |
Now we can create the SharePoint list, add the appropriate fields to it, and insert the data from DataTable to the list.
//------------
//first we need to connect to the SharePoint online site
//Here I use the main.Connect method, but you could also use the SPCoder's Explorer window for this.
//The third and the fourth parameters of the main.Connect method are username and password.
//It is possible to write those values in clear text, but here I use the SPCoder's encryption mechanism.
//ENCRYPTEDUSERNAME and ENCRYPTEDPASSWORD have been created using "Crypto helper" window
string myUsername = main.Decrypt("ENCRYPTEDUSERNAME");
string myPassword = main.Decrypt("ENCRYPTEDPASSWORD");
main.Connect("https://MYtenant.sharepoint.com/sites/SPCodertest/",
"SharePoint Client O365", myUsername, myPassword);//after this we are connected to the SP Online site and have the context (ClientContext) variable available
//you will also notice that the site has appeared in the Explorer window and you can
//expand its subsites and see all the lists and libraries
//prepare the code for creating lists (you can also open the Utils.csx file in
//SPCoder and execute it instead of the following line)
execFile("Scripts\\CSharp\\SharePoint\\Utils.csx");
//Here we prepare the fields of the list
List<SPCoderField> myFields = new List<SPCoderField> ();
for(int i = 0; i < headers.Count; i++)
{
    var header       = headers[i];
    string fieldType = "Number";
    if (header == "Country Other" || header == "Continent")  fieldType = "String";
    if (header =="#") continue;
    myFields.Add(new SPCoderField {
        Name = header.Replace(" ",""),
        DisplayName = header.Replace(" ",""),
        Type = fieldType,
        Group = "Corona",
        Values = null}
    );
}
//here we create the SharePoint list called Corona.
var list = CreateListWithFields(myFields, web, "Corona", context);
//------------
After this step you can open your SharePoint site in browser and check if the list is created. If everything went fine, you should see the empty list called Corona, with the columns that you were also able to see in GridViewer. Names of some of the columns have been changed due to the rules that SharePoint field names must follow, related to special characters.
The next step is to insert the data to the list. Here we use standard CSOM code for adding the items to the SharePoint list. We use some batching in order to speed up the process (pushing the data to server after every 50 newly added items):
//------------
//add the data to the list
//System.Data.DataRow row = table.Rows[0];
int cnt                 = 0;
foreach(System.Data.DataRow row in table.Rows)
{
    ListItemCreationInformation itemCreateInfo = new ListItemCreationInformation();
    ListItem oListItem                         = list.AddItem(itemCreateInfo);
    oListItem["Title"] = row["Country Other"].ToString();
    for(int i = 0; i < headers.Count; i++)
    {
        var header       = headers[i];
        if (!String.IsNullOrEmpty(row[header].ToString()))
        {
            if (header =="#") continue;
            string internalName = list.Fields
                                      .Where(m => m.Title == header.Replace(" ",""))
                                      .FirstOrDefault()
                                      .InternalName;
            if (header != "Country Other" && header != "Continent")
            {
                double num = Double.Parse(row[header].ToString());
                oListItem[internalName] = num;
            }
            else
            {
                oListItem[internalName] = row[header].ToString();
            }
        }
    }
    oListItem.Update();
//we are sending the data to the server after every 50 items for performance reasons
    if (++cnt % 50 == 0) context.ExecuteQuery();
}
context.ExecuteQuery();
//------------
After the code above is executed, we should be able to see the data in the SharePoint list.
Now, the next step is to create the modern page, add the pie-chart to it and show the Total cases per country on the chart.
This part of the code uses OfficeDevPnP CSOM library for easier handling of the modern pages. The library is included in SPCoder, so you don't have to download it yourself.
Now, the next step is to create the modern page, add the pie-chart to it and show the Total cases per country on the chart.
This part of the code uses OfficeDevPnP CSOM library for easier handling of the modern pages. The library is included in SPCoder, so you don't have to download it yourself.
using OfficeDevPnP.Core.Pages;

// get a list of possible client side web parts that can be added
ClientSidePage p = new ClientSidePage(context);
var components = p.AvailableClientSideComponents();

var myWebPart = components.Where(s => s.ComponentType == 1 && s.Manifest.Contains("QuickChartWebPart"))
                          .FirstOrDefault();
CanvasSection cs = new CanvasSection(p, CanvasSectionTemplate.OneColumn, 5);
p.AddSection(cs);

ClientSideWebPart helloWp = new ClientSideWebPart(myWebPart) { Order = 10 };
helloWp.PropertiesJson =
@"{'data':[{'id':'7CFFD4B0-436E-430D-94C5-A4F9D22DB3FE','label':'','value':'','valueNumber':0}],'type':1,
'isInitialState':false,'dataSourceType':1,'listItemOrderBy':0,
'selectedListId':'" + list.Id.ToString() + "','selectedLabelFieldName':'Title',
'selectedValueFieldName':'TotalCases','xAxisLabel':'','yAxisLabel':''}";

p.AddControl(helloWp, cs.Columns[0]);
//This will save the page to SitePages library
p.PageTitle = "Corona Stats page 2";
p.LayoutType = ClientSidePageLayoutType.Article;
p.Save("CoronaStats2.aspx");
After this code runs, you should check the SitePages library on your SharePoint online site and look for the CoronaStats2.aspx page. If everything worked fine the page should contain the pie chart with the total corona cases per country.
Subscribe to:
Posts (Atom)