Showing posts with label tools. Show all posts

Wednesday, July 08, 2020

SharePoint online - Get details of all SP Designer workflows

Microsoft has recently announced that SharePoint 2010 Workflows will be retired soon in the SharePoint online.

I personally think that the decision to remove a feature that is used a lot in production environments, with less than 4 months notice, during the corona crisis and summer vacations is totally not fair to the clients. Adding the fact that some of the functionalities SharePoint 2010 workflows offer don't have a proper replacement in the rest of MS services makes it unacceptable!

There is a UserVoice where you can vote that Microsoft postpones this date, so hopefuly there's somebody there who will listen to the community and give our clients more time for this.

Either way, we will need to prepare for the change, whenever it comes, and first thing that we need to do is to identify all the SP Designer Workflows that exist in our environments. In this post I will show how this can be done using SPCoder application.

SPCoder
First thing you need to do is get the latest version of SPCoder, either by downloading the zip package or getting the code from GitHub repo and building it yourself. You can also check out the SPCoder installation page for more details.
Then, run the SPCoder.exe, connect to your SharePoint online site collection using "SharePoint CSOM connector" and to the Github repo that contains the SPCoder scripts using "Github connector".


After that, expand the Scripts\SharePoint\SPWorkflowsGetter.csx file, open its content in SPCoder and execute the code by pressing "Execute (F5)" button.
With this we have registered the plugin for getting all workflows. If you want to register it automatically the next time SPCoder runs, you can save it in your SPCoder's Scripts\CSharp\Plugins directory.

Next thing we need to do is find the site we want to check in SPCoder Explorer view, right click it and choose the "Get Workflows" option.


That option will activate the plugin, get all the workflows (both 2010 and 2013) from all the subsites and display the grid with the results afterwards.


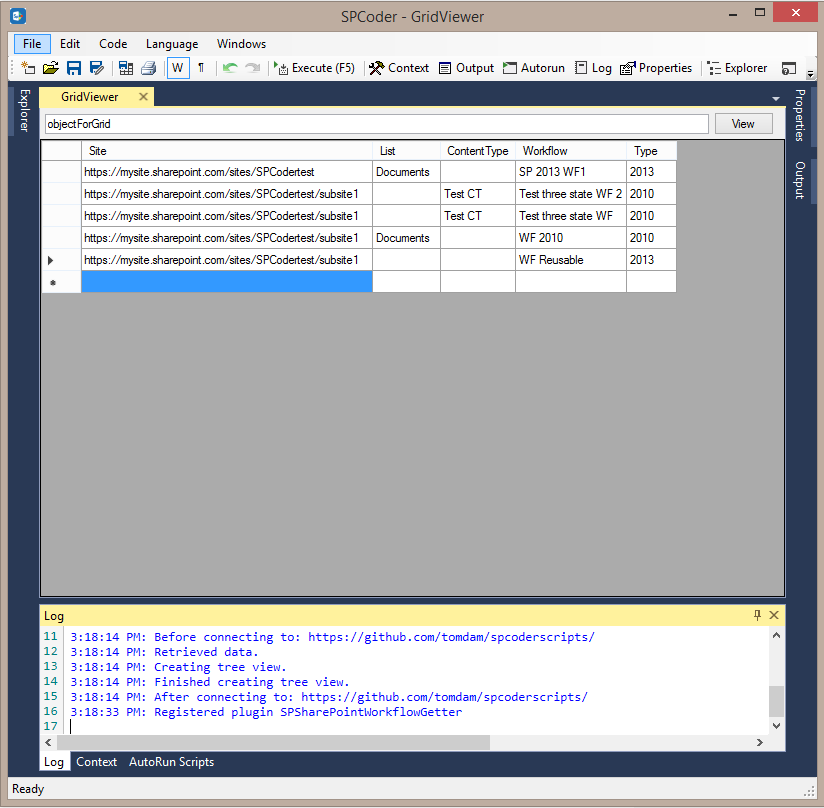
The time needed for this operation to finish depends on the number of the subsites, lists, libraries and content types in your site collection, so if you have a lot of those, please wait until it finishes.

As you can see from the screenshot above, the report will show you the site url, the list title in case the workflow is related to a list or library, the content type name in case the workflow is related to a content type and both List and ContentType columns will be empty in case of a reusable site workflow. There is also a Type column which tells you if the workflow is 2010 or 2013.

This report should be a good starting point for you to plan the restructuring of your environment and finding a way to replace your workflows with some alternatives.

Thursday, July 02, 2020

Generate a maze in C#

There are many alghoritms for maze generation out there. The wikipedia page gives some nice overview. Some people blogged a lot about mazes and even wrote a book about maze generation!

While playing with C# scripting in SPCoder, I implemented the recursive backtracking algorithm for maze generation in C#. SPCoder's log window is used to display the generated maze and it was a perfect fit for this task.

There are two versions of the algorithm, one that generates a maze and displays it and the other one that stores all the maze versions during the generation and then displays animation where you can see the steps that algorithm took to generate the maze.

SPCoder with Basic maze script loaded


SPCoder log window that displays animation
generated by Detailed maze example 


All you need to do to try it out is get the latest version of SPCoder, either by downloading the zip package or getting the code from GitHub repo and building it yourself, run it, load maze examples and execute them.

Maze implementation is stored in separate GitHub repo, which will in future contain all new SPCoder scripts. You can use SPCoder GitHub repo connector, connect to https://github.com/tomdam/spcoderscripts and load the BasicMaze.csx and DetailedMaze.csx in SPCoder (as shown on first screenshot). Or you can copy the code directly to SPCoder code window from BasicMaze.csx and DetailedMaze.csx.


Tuesday, June 30, 2020

Execute C# DotNetPerls examples in SPCoder

For years the website www.dotnetperls.com has been a very good resource for learning different programming languages. It is completely based on clearly described code examples and contains pages for different subjects (keywords, types, programming constructs, etc.) interlinked with other related topics.
The site is useful not only to beginners, but also to more experienced developers, because it contains examples with tips & tricks on many subjects, from basic to advanced ones. Personally, it saved me a lot of time with RegEx and DateTime formatting C# examples a couple of times.

Since SPCoder is a tool for writing and executing the C# code, and it supports creation of custom connectors which can connect to any datasource, I've written the DotNetPerls C# connector, which parses the C# examples from the site and makes it easy to open (and execute) them in SPCoder.

Connecting to DotNetPerls site
All you need to do to try it out is get the latest version of SPCoder, either by downloading the zip package or getting the code from GitHub repo and building it yourself, run it and make connection using DotNetPerls C# connector. After successful connection, the SPCoder's Explorer window will show the treeview with DotNetPerls C# pages and code examples.


You can then find the code example you want to see, right-click it and use the View Code menu item to open the source code in SPCoder's Code window.


Every code example in the treeview also has the Visit page menu item which will, if you use it, open the browser with exact page where the code is taken from. If you would use the same item as on the screenshot above, that page would be https://www.dotnetperls.com/enum

Executing the code
Once you open the code in code window, you can execute it by either pressing F5 on keyboard or clicking the Execute (F5) button.
If we execute the code sample from our previous screenshot, the output window will contain the result of a Console.WriteLine() call.


Using other SPCoder helper windows
Additional benefit of executing the code examples in SPCoder instead of creating separate Console applications in Visual Studio is that you can execute the code part by part and even use other SPCoder windows to examine the variables and see what is really going on there. For instance, you can open the C# program that uses DataTable (located under datatable topic), and select and execute only the content of the GetTable() method (also selected on the screenshot below).


After that, you can use the GridViewer window to check the content of the table variable


You can also use SPCoder Describer and Properties viewer windows to further explore the variables and learn more about their data types.

Conclusion
In this blog post we saw how SPCoder can be used to connect to a custom datasource (web site) and how content from that datasource can be used with different parts of SPCoder. For the source code of the connector, check out the GitHub repo.


Wednesday, June 24, 2020

Run C# script files in Azure WebJob

Azure WebJobs can be used to run background tasks (programs or scripts) in the cloud. You can write your code for WebJob in one of several available languages. Official documentation states that the following file types are supported:
  • .cmd, .bat, .exe (Windows cmd)
  • .ps1 (PowerShell)
  • .sh (Bash)
  • .php (PHP)
  • .py (Python)
  • .js (Node.js)
  • .jar (Java)

C# support
All .NET languages are supported and C# among them. If you write your code in C#, you can compile it to .exe console application and you will be able to run it as Azure WebJob.

What is currently not supported out of the box, is running C# script (.csx) files as Azure WebJobs.

While developing the SPCoder, I needed a way to run C# script files as background tasks using Windows Task Scheduler, so I implemented SPCoder.RunnerApp helper console application, which can be configured to run one or more .csx files. The same application can also be deployed to Azure and run as WebJob.

In this post I'll try to explain the steps on how SPCoder.RunnerApp can be deployed to Azure as WebJob and how you can later update just your script files, without the need for redeploying the SPCoder.RunnerApp application package again.

Getting the SPCoder.RunnerApp

In order to get the SPCoder.RunnerApp you need to either download the compiled package or clone the github repo and build the package yourself.


After you get the application, you need to write your business logic code. SPCoder.RunnerApp by default runs the Code\init.csx file. If necessary, you can change that setting in SPCoder.RunnerApp.exe.config file, by changing the CodePath app setting:
<add key="CodePath" value="Code\init.csx" />
The recommended way of organizing your code is to use init.csx only for adding necessary assembly references using the #r directive and registering other csx files for execution.
#r "System.Data"
#r "{{WorkingDirectory}}\mycustomlibrary.dll"
//...

//....
//here you can prepare all the csx files that should be executed
string folder = @"Code\";
FilesRegisteredForExecution.Add(folder + "code.csx");

//FilesRegisteredForExecution.Add(folder + "code1.csx");
//FilesRegisteredForExecution.Add(folder + "code2.csx");
//....    
In the code above you can see the {{WorkingDirectory}} placeholder, which will be replaced with current working directory before execution.

If you follow the recommendations, your business logic code should be located in file Code\code.csx. The default implementation has only one line which calls Console.WriteLine(); method. There you can write your useful code. You can use any tool for writing the code.

Creating the WebJob
First, you need to register for an Azure account and create an Azure AppService. I won't cover the steps for that here, since there are a lot of resources available online.

After you write the code you can test it by simply running SPCoder.RunnerApp.exe application. When you're sure that the code is finished, you can pack the whole folder to zip file and upload it to Azure.


For all the available options related to WebJobs please check the beforementioned official documentation.

Running the WebJob

After running the WebJob you can check its log for the details, and this is the sample log after running the default implementation:


You can notice the two INFO entries, which were caused by the Console.WriteLine calls in our .csx files.

Updating the csx files

If you need to tweek your csx files after deployment, you can do it directly in the browser using the Kudu tools. The page where you can do that is located here: https://{YOURAPPSERVICENAME}.scm.azurewebsites.net/DebugConsole


After you click the Edit icon next to the file name, you will get the following screen, where you can paste your updated code.


Immediately after you save the code it will become available for the next execution of your WebJob.

Conclusion
This post explains how you can run your C# code writen in csx script files in the Azure cloud, without having to compile it to exe file. The same package can be run with Windows Task Scheduler on a windows machine outside of Azure.

For more information on the SPCoder application, SPCoder.RunnerApp and other modules, please check the GitHub wiki documentation.

Thursday, January 09, 2014

SPCoder

Update 2020: This post is related to the old, IronPython version of SPCoder. For the new, C# version of SPCoder, please check this link.

I've been developing code for MS SharePoint since year 2004. SharePoint was evolving with every new version since then, but all the versions had one thing in common and that is the lack of an "easy" way to manipulate its object model. By "easy" here I mean visual, fast, scriptable. There is no tool where developer/admin could write some code in a visual environment directly on server, using full SharePoint object model, execute it, share it, etc.

There are a lot of very useful blogs out there where SP developers share a solution to a problem solved by writing simple console application which usually has 5-10 lines of code in which they call a couple of methods from SP object model. I also wrote a number of console apps like that in different situations and it was always taking me a lot of time.. firing up a dev machine with visual studio, writing code/compiling/testing on dev machine, publishing app to server and executing. Of course if you have to change anything you have to go through the procedure of write/compile/test/publish/execute again...

Ok, you certainly get my point by now :) So, my solution to this problem was to write a tool which you can use to interactively work with SharePoint's object model. It is called SPCoder, it is free to use and you can download it from https://spcoder.codeplex.com.

About

SPCoder uses IronPython for accessing SharePoint's object model. It works on server and foundation versions of SharePoint 2007, 2010 and 2013. Here is the screenshot of SPCoder in action:


You don't have to have any previous knowledge of IronPython in order to use SPCoder. In fact SPCoder has very useful features which you can use without any coding (Describer and Property viewer). The documentation of all the SPCoder's features can be found here: https://spcoder.codeplex.com/documentation
 
Here are a couple examples on what can be done with SPCoder:

#download all files from the SP library to a local folder
local = "C:\Temp\Imgs"
for i in list.Items:
    f = i.File    
    binary = f.OpenBinary()    
    stream = IO.FileStream(local + "/" + f.Name, IO.FileMode.Create)
    writer = IO.BinaryWriter(stream)
    writer.Write(binary)
    writer.Close()
 --

#add users to a security group if usernames are located in the SP list 
gr = web.SiteGroups["group_name"]
for l in list1.Items:
    u = web.EnsureUser(l["UserId"])
    gr.AddUser(u)
--

#change the content type for all items in the list
ct = list2.ContentTypes["ct_name"]
for i in list2.Items:  
    i["Content Type"] = ct.Name;
    i["Content Type ID"] = ct.Id.ToString();
    i.SystemUpdate()
--

The important thing to note here is that these example scripts will work on any SP server, you just need to drag'n'drop appropriate objects to SPCoder context window and name them like web, list, list1 and list2 (which SPCoder does by default for these types of objects).

If you want to try SPCoder, please first take a look at this Quick Tutorial. It will take you just a few minutes but it will give you all you need for start.

Friday, September 22, 2006

bez alata nema zanata : aptana - The Web IDE

Oduvek su me narodne poslovice oduševljavale.
Toliko mudrosti u samo par reči! Mudrosti koja traje večno. Mudrosti koja može da se primeni na veliki broj problema sa kojima se ljudi sreću, bez obzira na trenutak u kome se ljudi i problemi nalaze.
Iako znam da su te poslovice primenljive na dosta situacija iz prostog razloga što su jako apstraktne, ta rima im nekako daje dušu i čini ih večnim.
Elem.
Verovatno Vam se desilo da treba da pišete neki JavaScript kood.
U principu bilo ko, ko je ikada pravio neku web stranicu imao je potrebu da napiše, ako ništa drugo onda nekakav validator za unos e-maila i sl. U takvim situacijama za pisanje tog JavaScripta se naravno koristi okruženje u kome pravite i ostatak sajta.. dreamweaver, zend, visual studio, notepad... I to je OK.
Ali šta sa situacijom kada stranica treba da ima dosta klijentskog kooda. Dosta ~ 1000 linija ili nekoliko hiljada linija..!? Tada dolazi do izražaja činjenica da ni jedno od pomenutih okruženja nema dobru podršku za pisanje JavaScripta.
Nekako mi se čini da su svi ti alati , pošto su pravljeni za html + php,asp,jsp...(ili šta već) , JavaScript shvatili kao nužno zlo, i pravili samo neke osnovne stvari vezane za to nužno zlo...

Sa razvojem Web 2.0 priče naglo je porasla potreba za okruženjem koje je napravljeno za JavaScript. Moram priznati da sam se oduševio kada sam naleteo na Aptana-u.
To je IDE zasnovan na Eclipse platformi. Postoji standalone varijanta, kao i plugin za Eclipse, ukoliko ga već imate na računaru.
Ne bih sada da nabrajam opcije koje poseduje Aptana, jer postoji dokumentacija na zvaničnom sajtu, samo bih napomenuo da ima jako dobar Code Assist ili Intelli Sense (ako tako neko više voli ;) )


Neke od stvari koje uskoro planiraju da dodaju okruženju su:
  • Internationalization
  • PHP Colorizing
  • PHP Code Assist
  • JavaScript Debugging
  • Refactoring
  • ....
Sve u svemu, ozbiljno preporučujem da probate Aptana-u, jer će Vam sigurno uštedeti dosta vremena u radu.