Showing posts with label sharepoint. Show all posts

Thursday, July 16, 2020

Modern SharePoint story

John, a complete beginner: Wow, this is great... I can create a responsive, fancy list with shiny form and save the items there! Woohoo!

John, after two hours of experience: This is nice... I can add more different columns! We should recreate our old Excel application here!

John, after five hours of experience: Great, I can add another list and connect them both with lookup columns! It will be easy to recreate our old Excel file! Let's do it guys!

John, after one day of experience: Hmm... these formulas work, but... it is strange that we cannot reference other rows in formulas... This was easy in Excel...

John, after three days of experience: Ok, so this doesn't work, but ok, we don't need it anyway. But hey, we can change the color of our cells in the list! That's something!

John, after five days of experience: Ok, so we have removed some features that we had in the old Excel file. That's not a problem. We can live without it. This PowerApps thing is promising... I can easily create forms. Let's recreate our VBA forms from the old Excel file here.

John, after 8 days of experience: Ok, we can move the fields around, change colors, change fonts, we can connect to hundreds of external systems, we can even tweet from the form, but it looks like we cannot write this piece of business logic here... hmm.. there must be some way around...

John, after 10 days of experience: Ok, I got this. We need an Azure subscription to be able to deploy our Azure Function that will contain the business logic code. We will then call it from the form... I’ll ping Steve to help with this...

John, after 14 days of experience: Ok, I need to create an item in the third list after the value in this field changes from A to B. Ok, let's google this... Hmm... Stackoverflow says that there is some Flow thing that can be used here... Hmm... strange... they call it Power Automate on Microsoft's site... let's try it...

John, after 20 days of experience: Ok, let's try something else! Oh, it looks like there is something called SharePoint designer and a thing called SharePoint 2010 Workflow... it has exactly what I need. This is easy. I'll just create a workflow, add this action and create an item in the third list. Easy peasy!

John, after 20.2 days of experience: It would be good if I could send an email to Pete after an item is created in the third list. Let's try this Flow thing again, they say it's modern, so it must be good!

John, after 21 days of experience: Hmm, this looks fine, but it always sends an email from my account... Why can't it send it as some generic user? Hmm, it looks like this can again be done with this SharePoint designer workflow thing. Let's use it. It rocks.

John, after 21.5 days of experience: It would be good if we could create a task for Mike after an item is added to the list, so he can check it, set additional fields and approve it, just like in the old Excel file.

John, after 21.8 days of experience: Wow, this Planner thing looks promising! It has fancy colors, fancy design... wow, look at these shiny charts! I'm impressed. It's like trello, just shinier! Let's use it. Ok, I'll finally be able to use Flow, after an item is created in the list I'll create a task in Planner for Mike and he will get an email! Great!

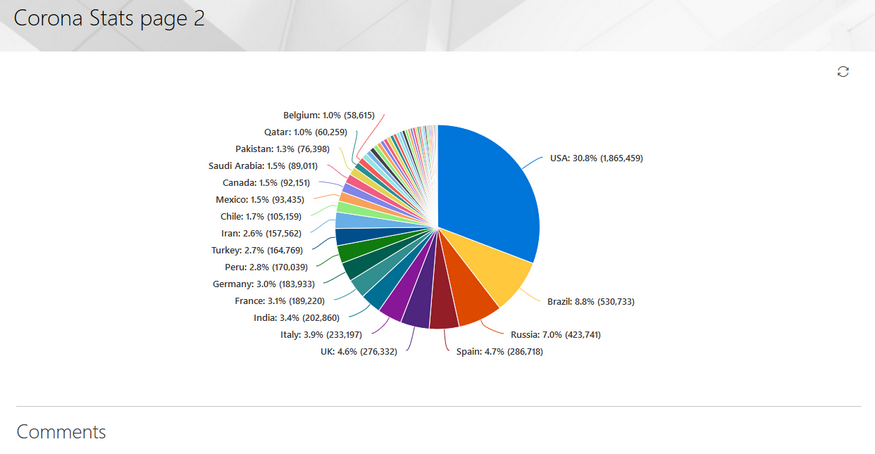
John, after 23 days of experience: Hmm, it looks like we can't have additional fields in Planner tasks... That's too bad... we were able to implement that in our old Excel file... But ok, we can live without it. Mike will just complete the task and we can later see some statistics in this fancy chart.

Production starts

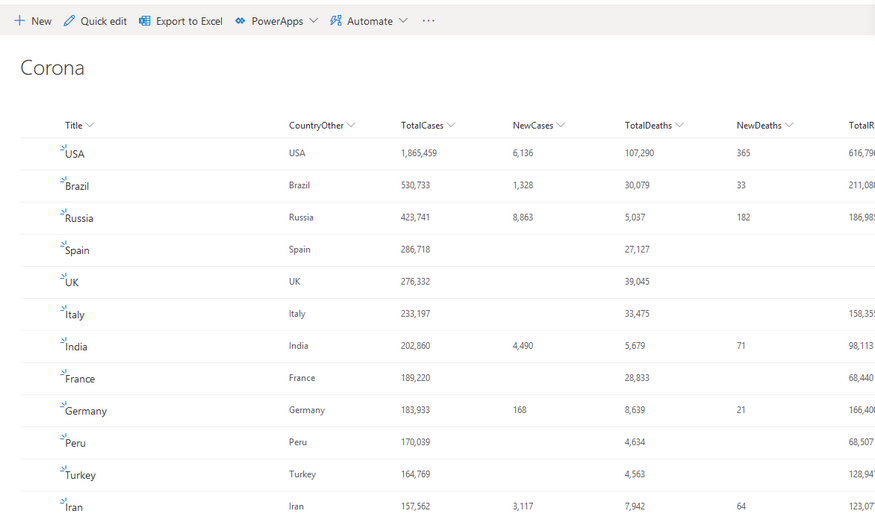
Users are adding items, changing items, sharing items...

Items are automatically being added to another list...

Pete receives emails whenever necessary...

Mike gets his tasks...

Everyone is happy...


Everything runs nicely, with sporadic, minor issues... until...


John, on day x: Hmm, it looks like there's some problem with this Flow thing... it doesn't run every time after an item is created... let's google this... oh, it looks like my plan has some limits... we need to buy a new subscription...

John, on day y: Hmm, it looks like there's some problem with this list... some strange limit... let's google this... oh... the list contains more than 5000 items and that's the problem... but this worked fine in our old Excel file!!! Let’s call Steve, he will know how to fix this...

John, on day z: Let's check some SharePoint related news... let's check which new, useful things will be available soon... Oh, what is this? Microsoft will retire SharePoint workflows 2010. Hmm, that must be something old... something that nobody is using anymore... not interesting... let's check some Corona news instead...

And then... November comes...

November 3rd 2020: Hmm, it looks like the items are not added to the third list anymore... Why is this happening? This has always worked fine... Let’s call Steve, he will know how to fix this...

November 9th 2020: Hmm, it looks like Pete is not receiving the emails anymore... Why did this suddenly stop working? Let’s call Steve, he'll know how to fix this...


Conclusion

All characters appearing in this story are fictional. Any resemblance to real persons is intentional!

If you want to help Mike to be able to create additional fields in his planner tasks, you can vote here.

If you want to help John not to be on Steve’s shooting list after November 1st, you can vote here. Fingers crossed!

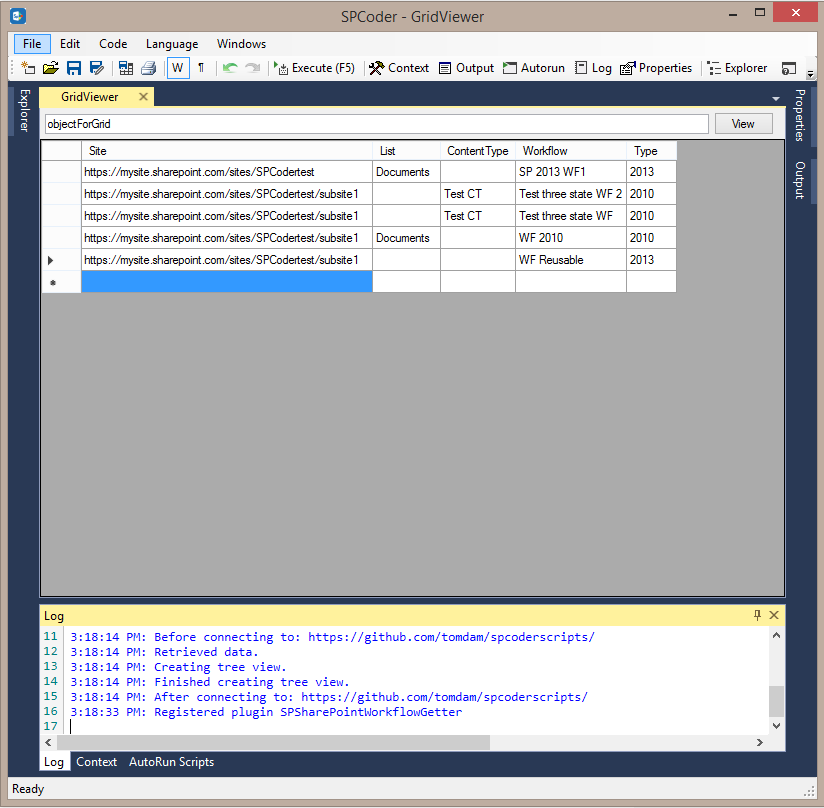
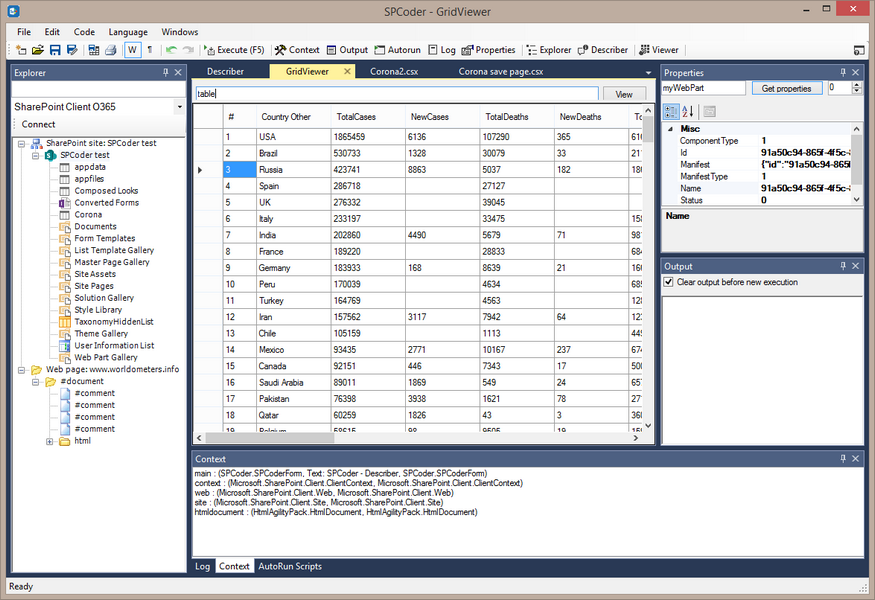
If you are the Steve in your company there’s not much help for you whatsoever... But, in case you need to prepare for November 1st, check out this page. It can help you to identify all the workflows created by Johns.

And Pete... he doesn’t need help... he just receives emails...


Wednesday, July 08, 2020

SharePoint online - Get details of all SP Designer workflows

Microsoft has recently announced that SharePoint 2010 Workflows will be retired soon in the SharePoint online.

I personally think that the decision to remove a feature that is used a lot in production environments, with less than 4 months notice, during the corona crisis and summer vacations is totally not fair to the clients. Adding the fact that some of the functionalities SharePoint 2010 workflows offer don't have a proper replacement in the rest of MS services makes it unacceptable!

There is a UserVoice where you can vote that Microsoft postpones this date, so hopefuly there's somebody there who will listen to the community and give our clients more time for this.

Either way, we will need to prepare for the change, whenever it comes, and first thing that we need to do is to identify all the SP Designer Workflows that exist in our environments. In this post I will show how this can be done using SPCoder application.

SPCoder
First thing you need to do is get the latest version of SPCoder, either by downloading the zip package or getting the code from GitHub repo and building it yourself. You can also check out the SPCoder installation page for more details.
Then, run the SPCoder.exe, connect to your SharePoint online site collection using "SharePoint CSOM connector" and to the Github repo that contains the SPCoder scripts using "Github connector".


After that, expand the Scripts\SharePoint\SPWorkflowsGetter.csx file, open its content in SPCoder and execute the code by pressing "Execute (F5)" button.
With this we have registered the plugin for getting all workflows. If you want to register it automatically the next time SPCoder runs, you can save it in your SPCoder's Scripts\CSharp\Plugins directory.

Next thing we need to do is find the site we want to check in SPCoder Explorer view, right click it and choose the "Get Workflows" option.


That option will activate the plugin, get all the workflows (both 2010 and 2013) from all the subsites and display the grid with the results afterwards.


The time needed for this operation to finish depends on the number of the subsites, lists, libraries and content types in your site collection, so if you have a lot of those, please wait until it finishes.

As you can see from the screenshot above, the report will show you the site url, the list title in case the workflow is related to a list or library, the content type name in case the workflow is related to a content type and both List and ContentType columns will be empty in case of a reusable site workflow. There is also a Type column which tells you if the workflow is 2010 or 2013.

This report should be a good starting point for you to plan the restructuring of your environment and finding a way to replace your workflows with some alternatives.

Monday, June 22, 2020

Corona can even spread to SharePoint - with C#

I've used SPCoder, (the tool for writing and executing C# code, that I had developed) to import Coronavirus data to SharePoint.

The idea is to get the data from the page that tracks the daily Coronavirus updates in the world:

Worldometer's COVID-19 data


Then, create a SharePoint list in SharePoint Online site and insert the coronavirus data to it:

SharePoint list with data from Worldometer site


And finally, create a SharePoint modern page, insert a chart webpart to it and show a pie-chart with coronavirus data:

SharePoint modern page - pie chart with coronavirus data


The code and explanation are also available on GitHub wiki page.
//Get the data using "Web page" connector
main.Connect("https://www.worldometers.info/coronavirus/#countries", "Web page");

//Get the table of latest infromation about the corona virus in the different countries
//------------

//here we use the HtmlAgilityPack project (https://html-agility-pack.net/)
//to scrape the page and get the html table element that contains the data

var htmlnode = htmldocument.DocumentNode;
var htmltable = htmlnode.SelectSingleNode("//table[@id='main_table_countries_today']");
var thnodes = htmltable.SelectSingleNode("thead").SelectNodes(".//th");

var tbodyNode = htmltable.SelectSingleNode("(tbody)[1]");
var nodes = tbodyNode.SelectNodes("tr[not(contains(@class,'row_continent'))]");

//create the DataTable object
var table = new DataTable("Corona");

var headers = thnodes.Select(th => th.InnerText.Trim()
    .Replace("\n","")
    .Replace(","," ")
    .Replace(" "," ")
    .Replace("/"," per "))
.ToList();

//create the columns in DataTable
foreach (var header in headers)
{
table.Columns.Add(header);
}

//get the rows from html table and clean some of the values
var rows = nodes.Skip(1).Select(tr => tr
.Elements("td")
.Select(td => td.InnerText.Trim()
                    .Replace(",","")
                    .Replace("N/A","")
                    .Replace("+",""))
.ToArray());

//add the rows to the DataTable
foreach (var row in rows)
{
table.Rows.Add(row);
}
//------------
After executing the previous part of the code, the coronavirus details are scraped from the web page and stored in DataTable variable called "table". You can open GridViewer in SPCoder, and inspect the variable:

SPCoder GridView window showing the scraped data


Now we can create the SharePoint list, add the appropriate fields to it, and insert the data from DataTable to the list.

//------------
//first we need to connect to the SharePoint online site
//Here I use the main.Connect method, but you could also use the SPCoder's Explorer window for this.
//The third and the fourth parameters of the main.Connect method are username and password.
//It is possible to write those values in clear text, but here I use the SPCoder's encryption mechanism.
//ENCRYPTEDUSERNAME and ENCRYPTEDPASSWORD have been created using "Crypto helper" window
string myUsername = main.Decrypt("ENCRYPTEDUSERNAME");
string myPassword = main.Decrypt("ENCRYPTEDPASSWORD");
main.Connect("https://MYtenant.sharepoint.com/sites/SPCodertest/", 
"SharePoint Client O365", myUsername, myPassword);
//after this we are connected to the SP Online site and have the context (ClientContext) variable available 
//you will also notice that the site has appeared in the Explorer window and you can
//expand its subsites and see all the lists and libraries
//prepare the code for creating lists (you can also open the Utils.csx file in 
//SPCoder and execute it instead of the following line)
execFile("Scripts\\CSharp\\SharePoint\\Utils.csx");
//Here we prepare the fields of the list
List<SPCoderField> myFields = new List<SPCoderField> ();
for(int i = 0; i < headers.Count; i++)
{
    var header       = headers[i];
    string fieldType = "Number";
    if (header == "Country Other" || header == "Continent")  fieldType = "String";
    if (header =="#") continue;
    myFields.Add(new SPCoderField {
        Name = header.Replace(" ",""),
        DisplayName = header.Replace(" ",""),
        Type = fieldType,
        Group = "Corona",
        Values = null}
    );
}   
//here we create the SharePoint list called Corona.
var list = CreateListWithFields(myFields, web, "Corona", context);
//------------

After this step you can open your SharePoint site in browser and check if the list is created. If everything went fine, you should see the empty list called Corona, with the columns that you were also able to see in GridViewer. Names of some of the columns have been changed due to the rules that SharePoint field names must follow, related to special characters.

The next step is to insert the data to the list. Here we use standard CSOM code for adding the items to the SharePoint list. We use some batching in order to speed up the process (pushing the data to server after every 50 newly added items):
//------------
//add the data to the list
//System.Data.DataRow row = table.Rows[0];
int cnt                 = 0;
foreach(System.Data.DataRow row in table.Rows)
{
    ListItemCreationInformation itemCreateInfo = new ListItemCreationInformation();
    ListItem oListItem                         = list.AddItem(itemCreateInfo);
    oListItem["Title"] = row["Country Other"].ToString();
   for(int i = 0; i < headers.Count; i++)
    {
        var header       = headers[i];
        if (!String.IsNullOrEmpty(row[header].ToString()))
        {
            if (header =="#") continue;
            string internalName = list.Fields
                                      .Where(m => m.Title == header.Replace(" ",""))
                                     .FirstOrDefault()
                                     .InternalName;
            if (header != "Country Other" && header != "Continent")
            {
                double num = Double.Parse(row[header].ToString());
                oListItem[internalName] = num;
            }
            else
            {
                oListItem[internalName] = row[header].ToString();
            }
        }
    }
    oListItem.Update();
//we are sending the data to the server after every 50 items for performance reasons
    if (++cnt % 50 == 0) context.ExecuteQuery();
}   
context.ExecuteQuery();
//------------
After the code above is executed, we should be able to see the data in the SharePoint list.

Now, the next step is to create the modern page, add the pie-chart to it and show the Total cases per country on the chart.
This part of the code uses OfficeDevPnP CSOM library for easier handling of the modern pages. The library is included in SPCoder, so you don't have to download it yourself.

using OfficeDevPnP.Core.Pages;

// get a list of possible client side web parts that can be added
ClientSidePage p = new ClientSidePage(context);
var components = p.AvailableClientSideComponents();

var myWebPart = components.Where(s => s.ComponentType == 1 && s.Manifest.Contains("QuickChartWebPart"))
                         .FirstOrDefault();
CanvasSection cs = new CanvasSection(p, CanvasSectionTemplate.OneColumn, 5);
p.AddSection(cs);

ClientSideWebPart helloWp = new ClientSideWebPart(myWebPart) { Order = 10 };
helloWp.PropertiesJson =
@"{'data':[{'id':'7CFFD4B0-436E-430D-94C5-A4F9D22DB3FE','label':'','value':'','valueNumber':0}],'type':1,
'isInitialState':false,'dataSourceType':1,'listItemOrderBy':0,
'selectedListId':'" + list.Id.ToString() + "','selectedLabelFieldName':'Title',
'selectedValueFieldName':'TotalCases','xAxisLabel':'','yAxisLabel':''}";

p.AddControl(helloWp, cs.Columns[0]);
//This will save the page to SitePages library
p.PageTitle = "Corona Stats page 2";
p.LayoutType = ClientSidePageLayoutType.Article;
p.Save("CoronaStats2.aspx");
After this code runs, you should check the SitePages library on your SharePoint online site and look for the CoronaStats2.aspx page. If everything worked fine the page should contain the pie chart with the total corona cases per country.

Sunday, April 19, 2020

SharePoint online - use classic rich text editor in spfx webpart


In one of my recent projects for SharePoint online, the client wanted to use the classic rich text editor in the SharePoint Framework (spfx) webpart. The one that is available by default when you edit a Multiple lines of text field in classic SharePoint experience.


The reason for this was the fact they knew how to use it from previous experience in SharePoint on-premise and the fact that all available rich text editors for modern pages had (and still do have!) many limitations.

I did some research and found out that Microsoft also uses the classic editor when editing the content of the rich text fields in modern list experience (details pane).

So I've implemented similar functionality in my webpart, which can be used on any modern or classic page for editing rich text/html.

The implemented DEMO webpart looks like this:


After clicking on the "Edit html" button, the dialog box with the editor, containing the html code opens:


You can also edit the html directly if you click the "Edit Source" button:

Implementation

In short, my approach was to:
  • use the out of the box NewForm.aspx page in dialog box, with only one rich text field; 
  • fill the field with some initial html using client side code;
  • allow the user to edit the html and click the Save button;
  • get the produced html into a javascript variable, prevent default saving and close the dialog box.
After that you can do anything with the produced html (save it in a list or library field, send it to some third-party API, save it as a property of a webpart...). My DEMO webpart saves the edited html in it's property variable.

Setup

In order for the webpart to work, you need to provide it with the title of a list and a name of the Multiple lines of text column.You can, of course, use any existing list for this, but I created a separate list (called TmpTextEditHelper), added one Multiple lines of text column (called HtmlField) and selected Enhanced rich text (Rich text with pictures, tables, and hyperlinks) as type of text. The important thing to mention is that, webpart will NEVER save anything to this list. 

The NewForm page can be opened with the following link:
https://YOURTENANT.sharepoint.com/sites/YOURSITE/Lists/TmpTextEditHelper/NewForm.aspx?OnlyIncludeOneField=HtmlField&ClientFormOverwriteSave=1&isdlg=1
  • TmpTextEditHelper - The name of the list.
  • OnlyIncludeOneField=HtmlField - Tells the server side code to render only one field (HtmlField) and exclude other fields like Title.
  • ClientFormOverwriteSave=1 - Microsoft uses this parameter also when opening the form in modern list edit pane. It probably tells the server side code not to save the form in case it is submitted, but I wasn't able to find any documentation on it.
  • isdlg=1 - Tells the server side code that the form will be viewed inside the dialog, so it does not render any unnecessary things, like navigation

Installation

After the webpart is added to AppCatalog, set as trusted and added to the SharePoint site, it can be added to any page. After adding to the page, you need to edit it's properties and set the name of the list and the field to be used, as described above.

You can find the source code for the webpart here.


Thursday, January 09, 2014

SPCoder

Update 2020: This post is related to the old, IronPython version of SPCoder. For the new, C# version of SPCoder, please check this link.

I've been developing code for MS SharePoint since year 2004. SharePoint was evolving with every new version since then, but all the versions had one thing in common and that is the lack of an "easy" way to manipulate its object model. By "easy" here I mean visual, fast, scriptable. There is no tool where developer/admin could write some code in a visual environment directly on server, using full SharePoint object model, execute it, share it, etc.

There are a lot of very useful blogs out there where SP developers share a solution to a problem solved by writing simple console application which usually has 5-10 lines of code in which they call a couple of methods from SP object model. I also wrote a number of console apps like that in different situations and it was always taking me a lot of time.. firing up a dev machine with visual studio, writing code/compiling/testing on dev machine, publishing app to server and executing. Of course if you have to change anything you have to go through the procedure of write/compile/test/publish/execute again...

Ok, you certainly get my point by now :) So, my solution to this problem was to write a tool which you can use to interactively work with SharePoint's object model. It is called SPCoder, it is free to use and you can download it from https://spcoder.codeplex.com.

About

SPCoder uses IronPython for accessing SharePoint's object model. It works on server and foundation versions of SharePoint 2007, 2010 and 2013. Here is the screenshot of SPCoder in action:


You don't have to have any previous knowledge of IronPython in order to use SPCoder. In fact SPCoder has very useful features which you can use without any coding (Describer and Property viewer). The documentation of all the SPCoder's features can be found here: https://spcoder.codeplex.com/documentation
 
Here are a couple examples on what can be done with SPCoder:

#download all files from the SP library to a local folder
local = "C:\Temp\Imgs"
for i in list.Items:
    f = i.File    
    binary = f.OpenBinary()    
    stream = IO.FileStream(local + "/" + f.Name, IO.FileMode.Create)
    writer = IO.BinaryWriter(stream)
    writer.Write(binary)
    writer.Close()
 --

#add users to a security group if usernames are located in the SP list 
gr = web.SiteGroups["group_name"]
for l in list1.Items:
    u = web.EnsureUser(l["UserId"])
    gr.AddUser(u)
--

#change the content type for all items in the list
ct = list2.ContentTypes["ct_name"]
for i in list2.Items:  
    i["Content Type"] = ct.Name;
    i["Content Type ID"] = ct.Id.ToString();
    i.SystemUpdate()
--

The important thing to note here is that these example scripts will work on any SP server, you just need to drag'n'drop appropriate objects to SPCoder context window and name them like web, list, list1 and list2 (which SPCoder does by default for these types of objects).

If you want to try SPCoder, please first take a look at this Quick Tutorial. It will take you just a few minutes but it will give you all you need for start.