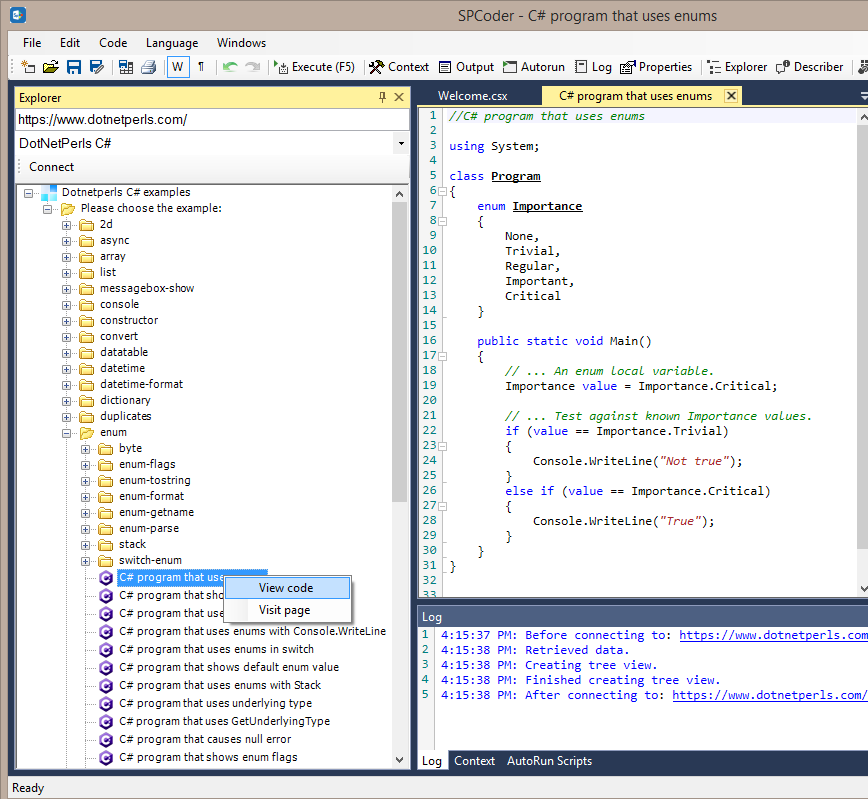
Tuesday, June 30, 2020

Execute C# DotNetPerls examples in SPCoder

For years the website www.dotnetperls.com has been a very good resource for learning different programming languages. It is completely based on clearly described code examples and contains pages for different subjects (keywords, types, programming constructs, etc.) interlinked with other related topics.
The site is useful not only to beginners, but also to more experienced developers, because it contains examples with tips & tricks on many subjects, from basic to advanced ones. Personally, it saved me a lot of time with RegEx and DateTime formatting C# examples a couple of times.

Since SPCoder is a tool for writing and executing the C# code, and it supports creation of custom connectors which can connect to any datasource, I've written the DotNetPerls C# connector, which parses the C# examples from the site and makes it easy to open (and execute) them in SPCoder.

Connecting to DotNetPerls site
All you need to do to try it out is get the latest version of SPCoder, either by downloading the zip package or getting the code from GitHub repo and building it yourself, run it and make connection using DotNetPerls C# connector. After successful connection, the SPCoder's Explorer window will show the treeview with DotNetPerls C# pages and code examples.


You can then find the code example you want to see, right-click it and use the View Code menu item to open the source code in SPCoder's Code window.


Every code example in the treeview also has the Visit page menu item which will, if you use it, open the browser with exact page where the code is taken from. If you would use the same item as on the screenshot above, that page would be https://www.dotnetperls.com/enum

Executing the code
Once you open the code in code window, you can execute it by either pressing F5 on keyboard or clicking the Execute (F5) button.
If we execute the code sample from our previous screenshot, the output window will contain the result of a Console.WriteLine() call.


Using other SPCoder helper windows
Additional benefit of executing the code examples in SPCoder instead of creating separate Console applications in Visual Studio is that you can execute the code part by part and even use other SPCoder windows to examine the variables and see what is really going on there. For instance, you can open the C# program that uses DataTable (located under datatable topic), and select and execute only the content of the GetTable() method (also selected on the screenshot below).


After that, you can use the GridViewer window to check the content of the table variable


You can also use SPCoder Describer and Properties viewer windows to further explore the variables and learn more about their data types.

Conclusion
In this blog post we saw how SPCoder can be used to connect to a custom datasource (web site) and how content from that datasource can be used with different parts of SPCoder. For the source code of the connector, check out the GitHub repo.


Wednesday, June 24, 2020

Run C# script files in Azure WebJob

Azure WebJobs can be used to run background tasks (programs or scripts) in the cloud. You can write your code for WebJob in one of several available languages. Official documentation states that the following file types are supported:
  • .cmd, .bat, .exe (Windows cmd)
  • .ps1 (PowerShell)
  • .sh (Bash)
  • .php (PHP)
  • .py (Python)
  • .js (Node.js)
  • .jar (Java)

C# support
All .NET languages are supported and C# among them. If you write your code in C#, you can compile it to .exe console application and you will be able to run it as Azure WebJob.

What is currently not supported out of the box, is running C# script (.csx) files as Azure WebJobs.

While developing the SPCoder, I needed a way to run C# script files as background tasks using Windows Task Scheduler, so I implemented SPCoder.RunnerApp helper console application, which can be configured to run one or more .csx files. The same application can also be deployed to Azure and run as WebJob.

In this post I'll try to explain the steps on how SPCoder.RunnerApp can be deployed to Azure as WebJob and how you can later update just your script files, without the need for redeploying the SPCoder.RunnerApp application package again.

Getting the SPCoder.RunnerApp

In order to get the SPCoder.RunnerApp you need to either download the compiled package or clone the github repo and build the package yourself.


After you get the application, you need to write your business logic code. SPCoder.RunnerApp by default runs the Code\init.csx file. If necessary, you can change that setting in SPCoder.RunnerApp.exe.config file, by changing the CodePath app setting:
<add key="CodePath" value="Code\init.csx" />
The recommended way of organizing your code is to use init.csx only for adding necessary assembly references using the #r directive and registering other csx files for execution.
#r "System.Data"
#r "{{WorkingDirectory}}\mycustomlibrary.dll"
//...

//....
//here you can prepare all the csx files that should be executed
string folder = @"Code\";
FilesRegisteredForExecution.Add(folder + "code.csx");

//FilesRegisteredForExecution.Add(folder + "code1.csx");
//FilesRegisteredForExecution.Add(folder + "code2.csx");
//....    
In the code above you can see the {{WorkingDirectory}} placeholder, which will be replaced with current working directory before execution.

If you follow the recommendations, your business logic code should be located in file Code\code.csx. The default implementation has only one line which calls Console.WriteLine(); method. There you can write your useful code. You can use any tool for writing the code.

Creating the WebJob
First, you need to register for an Azure account and create an Azure AppService. I won't cover the steps for that here, since there are a lot of resources available online.

After you write the code you can test it by simply running SPCoder.RunnerApp.exe application. When you're sure that the code is finished, you can pack the whole folder to zip file and upload it to Azure.


For all the available options related to WebJobs please check the beforementioned official documentation.

Running the WebJob

After running the WebJob you can check its log for the details, and this is the sample log after running the default implementation:


You can notice the two INFO entries, which were caused by the Console.WriteLine calls in our .csx files.

Updating the csx files

If you need to tweek your csx files after deployment, you can do it directly in the browser using the Kudu tools. The page where you can do that is located here: https://{YOURAPPSERVICENAME}.scm.azurewebsites.net/DebugConsole


After you click the Edit icon next to the file name, you will get the following screen, where you can paste your updated code.


Immediately after you save the code it will become available for the next execution of your WebJob.

Conclusion
This post explains how you can run your C# code writen in csx script files in the Azure cloud, without having to compile it to exe file. The same package can be run with Windows Task Scheduler on a windows machine outside of Azure.

For more information on the SPCoder application, SPCoder.RunnerApp and other modules, please check the GitHub wiki documentation.

Monday, June 22, 2020

Corona can even spread to SharePoint - with C#

I've used SPCoder, (the tool for writing and executing C# code, that I had developed) to import Coronavirus data to SharePoint.

The idea is to get the data from the page that tracks the daily Coronavirus updates in the world:

Worldometer's COVID-19 data


Then, create a SharePoint list in SharePoint Online site and insert the coronavirus data to it:

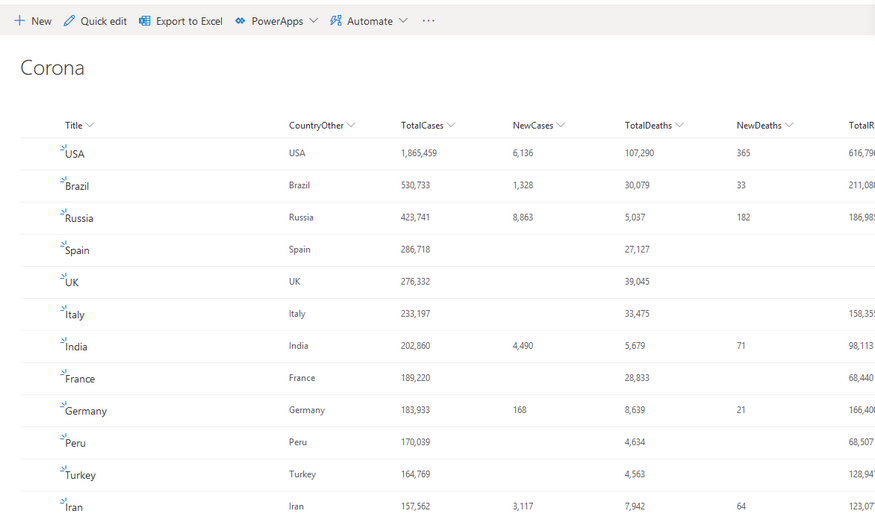
SharePoint list with data from Worldometer site


And finally, create a SharePoint modern page, insert a chart webpart to it and show a pie-chart with coronavirus data:

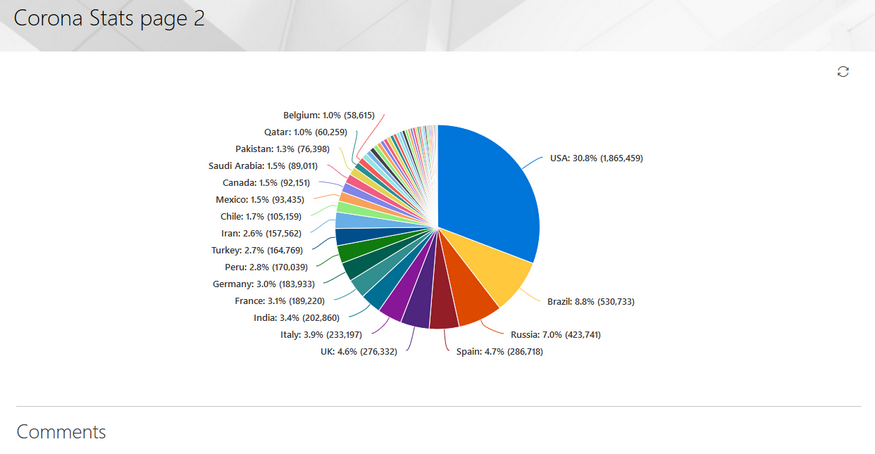
SharePoint modern page - pie chart with coronavirus data


The code and explanation are also available on GitHub wiki page.
//Get the data using "Web page" connector
main.Connect("https://www.worldometers.info/coronavirus/#countries", "Web page");

//Get the table of latest infromation about the corona virus in the different countries
//------------

//here we use the HtmlAgilityPack project (https://html-agility-pack.net/)
//to scrape the page and get the html table element that contains the data

var htmlnode = htmldocument.DocumentNode;
var htmltable = htmlnode.SelectSingleNode("//table[@id='main_table_countries_today']");
var thnodes = htmltable.SelectSingleNode("thead").SelectNodes(".//th");

var tbodyNode = htmltable.SelectSingleNode("(tbody)[1]");
var nodes = tbodyNode.SelectNodes("tr[not(contains(@class,'row_continent'))]");

//create the DataTable object
var table = new DataTable("Corona");

var headers = thnodes.Select(th => th.InnerText.Trim()
    .Replace("\n","")
    .Replace(","," ")
    .Replace("&nbsp;"," ")
    .Replace("/"," per "))
.ToList();

//create the columns in DataTable
foreach (var header in headers)
{
table.Columns.Add(header);
}

//get the rows from html table and clean some of the values
var rows = nodes.Skip(1).Select(tr => tr
.Elements("td")
.Select(td => td.InnerText.Trim()
                    .Replace(",","")
                    .Replace("N/A","")
                    .Replace("+",""))
.ToArray());

//add the rows to the DataTable
foreach (var row in rows)
{
table.Rows.Add(row);
}
//------------
After executing the previous part of the code, the coronavirus details are scraped from the web page and stored in DataTable variable called "table". You can open GridViewer in SPCoder, and inspect the variable:

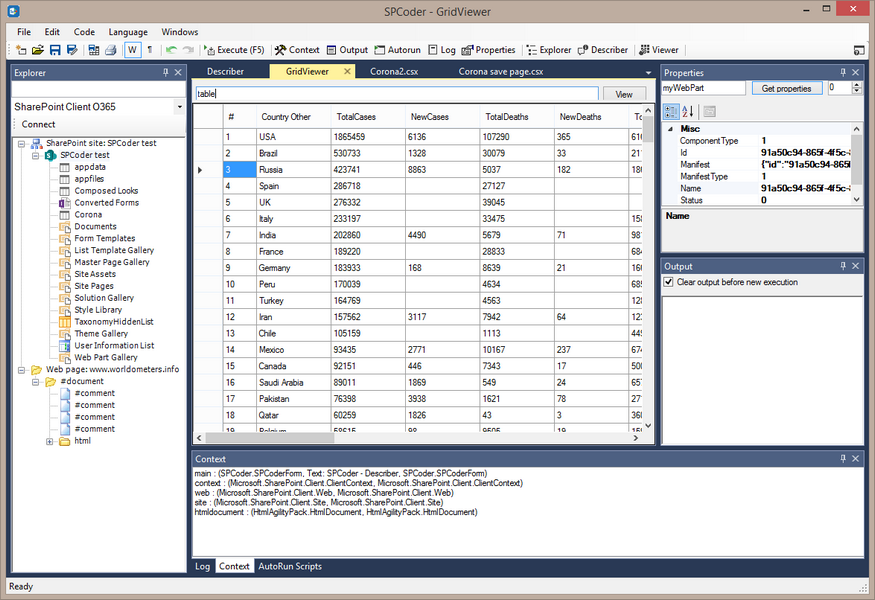
SPCoder GridView window showing the scraped data


Now we can create the SharePoint list, add the appropriate fields to it, and insert the data from DataTable to the list.

//------------
//first we need to connect to the SharePoint online site
//Here I use the main.Connect method, but you could also use the SPCoder's Explorer window for this.
//The third and the fourth parameters of the main.Connect method are username and password.
//It is possible to write those values in clear text, but here I use the SPCoder's encryption mechanism.
//ENCRYPTEDUSERNAME and ENCRYPTEDPASSWORD have been created using "Crypto helper" window
string myUsername = main.Decrypt("ENCRYPTEDUSERNAME");
string myPassword = main.Decrypt("ENCRYPTEDPASSWORD");
main.Connect("https://MYtenant.sharepoint.com/sites/SPCodertest/", 
"SharePoint Client O365", myUsername, myPassword);
//after this we are connected to the SP Online site and have the context (ClientContext) variable available 
//you will also notice that the site has appeared in the Explorer window and you can
//expand its subsites and see all the lists and libraries
//prepare the code for creating lists (you can also open the Utils.csx file in 
//SPCoder and execute it instead of the following line)
execFile("Scripts\\CSharp\\SharePoint\\Utils.csx");
//Here we prepare the fields of the list
List<SPCoderField> myFields = new List<SPCoderField> ();
for(int i = 0; i < headers.Count; i++)
{
    var header       = headers[i];
    string fieldType = "Number";
    if (header == "Country Other" || header == "Continent")  fieldType = "String";
    if (header =="#") continue;
    myFields.Add(new SPCoderField {
        Name = header.Replace(" ",""),
        DisplayName = header.Replace(" ",""),
        Type = fieldType,
        Group = "Corona",
        Values = null}
    );
}   
//here we create the SharePoint list called Corona.
var list = CreateListWithFields(myFields, web, "Corona", context);
//------------

After this step you can open your SharePoint site in browser and check if the list is created. If everything went fine, you should see the empty list called Corona, with the columns that you were also able to see in GridViewer. Names of some of the columns have been changed due to the rules that SharePoint field names must follow, related to special characters.

The next step is to insert the data to the list. Here we use standard CSOM code for adding the items to the SharePoint list. We use some batching in order to speed up the process (pushing the data to server after every 50 newly added items):
//------------
//add the data to the list
//System.Data.DataRow row = table.Rows[0];
int cnt                 = 0;
foreach(System.Data.DataRow row in table.Rows)
{
    ListItemCreationInformation itemCreateInfo = new ListItemCreationInformation();
    ListItem oListItem                         = list.AddItem(itemCreateInfo);
    oListItem["Title"] = row["Country Other"].ToString();
   for(int i = 0; i < headers.Count; i++)
    {
        var header       = headers[i];
        if (!String.IsNullOrEmpty(row[header].ToString()))
        {
            if (header =="#") continue;
            string internalName = list.Fields
                                      .Where(m => m.Title == header.Replace(" ",""))
                                     .FirstOrDefault()
                                     .InternalName;
            if (header != "Country Other" && header != "Continent")
            {
                double num = Double.Parse(row[header].ToString());
                oListItem[internalName] = num;
            }
            else
            {
                oListItem[internalName] = row[header].ToString();
            }
        }
    }
    oListItem.Update();
//we are sending the data to the server after every 50 items for performance reasons
    if (++cnt % 50 == 0) context.ExecuteQuery();
}   
context.ExecuteQuery();
//------------
After the code above is executed, we should be able to see the data in the SharePoint list.

Now, the next step is to create the modern page, add the pie-chart to it and show the Total cases per country on the chart.
This part of the code uses OfficeDevPnP CSOM library for easier handling of the modern pages. The library is included in SPCoder, so you don't have to download it yourself.

using OfficeDevPnP.Core.Pages;

// get a list of possible client side web parts that can be added
ClientSidePage p = new ClientSidePage(context);
var components = p.AvailableClientSideComponents();

var myWebPart = components.Where(s => s.ComponentType == 1 && s.Manifest.Contains("QuickChartWebPart"))
                         .FirstOrDefault();
CanvasSection cs = new CanvasSection(p, CanvasSectionTemplate.OneColumn, 5);
p.AddSection(cs);

ClientSideWebPart helloWp = new ClientSideWebPart(myWebPart) { Order = 10 };
helloWp.PropertiesJson =
@"{'data':[{'id':'7CFFD4B0-436E-430D-94C5-A4F9D22DB3FE','label':'','value':'','valueNumber':0}],'type':1,
'isInitialState':false,'dataSourceType':1,'listItemOrderBy':0,
'selectedListId':'" + list.Id.ToString() + "','selectedLabelFieldName':'Title',
'selectedValueFieldName':'TotalCases','xAxisLabel':'','yAxisLabel':''}";

p.AddControl(helloWp, cs.Columns[0]);
//This will save the page to SitePages library
p.PageTitle = "Corona Stats page 2";
p.LayoutType = ClientSidePageLayoutType.Article;
p.Save("CoronaStats2.aspx");
After this code runs, you should check the SitePages library on your SharePoint online site and look for the CoronaStats2.aspx page. If everything worked fine the page should contain the pie chart with the total corona cases per country.