I've used SPCoder, (the tool for writing and executing C# code, that I had developed) to import Coronavirus data to SharePoint.
The idea is to get the data from the page that tracks the daily Coronavirus updates in the world:
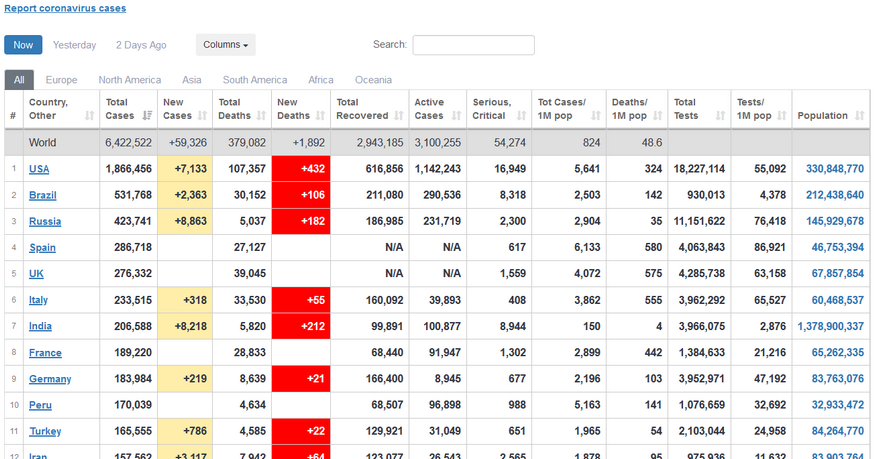 |
| Worldometer's COVID-19 data |
Then, create a SharePoint list in SharePoint Online site and insert the coronavirus data to it:
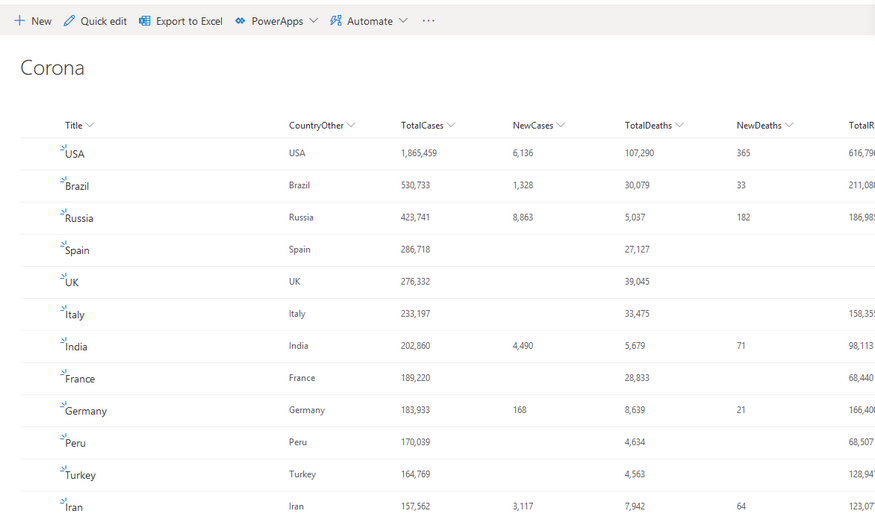 |
| SharePoint list with data from Worldometer site |
And finally, create a SharePoint modern page, insert a chart webpart to it and show a pie-chart with coronavirus data:
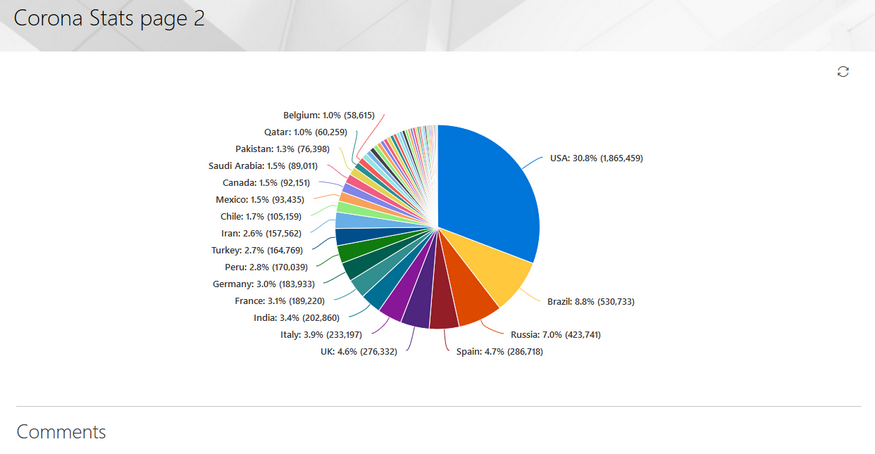 |
| SharePoint modern page - pie chart with coronavirus data |
The code and explanation are also available on GitHub wiki page.
//Get the data using "Web page" connector
main.Connect("https://www.worldometers.info/coronavirus/#countries", "Web page");

//Get the table of latest infromation about the corona virus in the different countries
//------------

//here we use the HtmlAgilityPack project (https://html-agility-pack.net/)
//to scrape the page and get the html table element that contains the data

var htmlnode = htmldocument.DocumentNode;
var htmltable = htmlnode.SelectSingleNode("//table[@id='main_table_countries_today']");
var thnodes = htmltable.SelectSingleNode("thead").SelectNodes(".//th");

var tbodyNode = htmltable.SelectSingleNode("(tbody)[1]");
var nodes     = tbodyNode.SelectNodes("tr[not(contains(@class,'row_continent'))]");

//create the DataTable object
var table = new DataTable("Corona");

var headers = thnodes.Select(th => th.InnerText.Trim()
    .Replace("\n","")
    .Replace(","," ")
    .Replace(" "," ")
    .Replace("/"," per "))
.ToList();

//create the columns in DataTable
foreach (var header in headers)
{
    table.Columns.Add(header);
}

//get the rows from html table and clean some of the values
var rows = nodes.Skip(1).Select(tr => tr
    .Elements("td")
    .Select(td => td.InnerText.Trim()
                    .Replace(",","")
                    .Replace("N/A","")
                    .Replace("+",""))
    .ToArray());

//add the rows to the DataTable
foreach (var row in rows)
{
    table.Rows.Add(row);
}
//------------
After executing the previous part of the code, the coronavirus details are scraped from the web page and stored in DataTable variable called "table". You can open GridViewer in SPCoder, and inspect the variable:
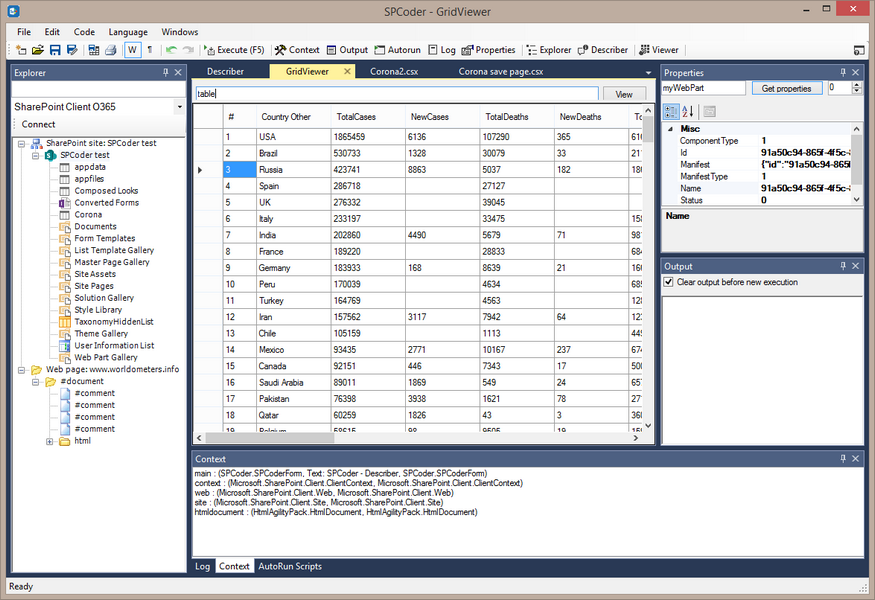 |
| SPCoder GridView window showing the scraped data |
Now we can create the SharePoint list, add the appropriate fields to it, and insert the data from DataTable to the list.
//------------
//first we need to connect to the SharePoint online site
//Here I use the main.Connect method, but you could also use the SPCoder's Explorer window for this.
//The third and the fourth parameters of the main.Connect method are username and password.
//It is possible to write those values in clear text, but here I use the SPCoder's encryption mechanism.
//ENCRYPTEDUSERNAME and ENCRYPTEDPASSWORD have been created using "Crypto helper" window
string myUsername = main.Decrypt("ENCRYPTEDUSERNAME");
string myPassword = main.Decrypt("ENCRYPTEDPASSWORD");
main.Connect("https://MYtenant.sharepoint.com/sites/SPCodertest/",
"SharePoint Client O365", myUsername, myPassword);//after this we are connected to the SP Online site and have the context (ClientContext) variable available
//you will also notice that the site has appeared in the Explorer window and you can
//expand its subsites and see all the lists and libraries
//prepare the code for creating lists (you can also open the Utils.csx file in
//SPCoder and execute it instead of the following line)
execFile("Scripts\\CSharp\\SharePoint\\Utils.csx");
//Here we prepare the fields of the list
List<SPCoderField> myFields = new List<SPCoderField> ();
for(int i = 0; i < headers.Count; i++)
{
    var header       = headers[i];
    string fieldType = "Number";
    if (header == "Country Other" || header == "Continent")  fieldType = "String";
    if (header =="#") continue;
    myFields.Add(new SPCoderField {
        Name = header.Replace(" ",""),
        DisplayName = header.Replace(" ",""),
        Type = fieldType,
        Group = "Corona",
        Values = null}
    );
}
//here we create the SharePoint list called Corona.
var list = CreateListWithFields(myFields, web, "Corona", context);
//------------
After this step you can open your SharePoint site in browser and check if the list is created. If everything went fine, you should see the empty list called Corona, with the columns that you were also able to see in GridViewer. Names of some of the columns have been changed due to the rules that SharePoint field names must follow, related to special characters.
The next step is to insert the data to the list. Here we use standard CSOM code for adding the items to the SharePoint list. We use some batching in order to speed up the process (pushing the data to server after every 50 newly added items):
//------------
//add the data to the list
//System.Data.DataRow row = table.Rows[0];
int cnt                 = 0;
foreach(System.Data.DataRow row in table.Rows)
{
    ListItemCreationInformation itemCreateInfo = new ListItemCreationInformation();
    ListItem oListItem                         = list.AddItem(itemCreateInfo);
    oListItem["Title"] = row["Country Other"].ToString();
    for(int i = 0; i < headers.Count; i++)
    {
        var header       = headers[i];
        if (!String.IsNullOrEmpty(row[header].ToString()))
        {
            if (header =="#") continue;
            string internalName = list.Fields
                                      .Where(m => m.Title == header.Replace(" ",""))
                                      .FirstOrDefault()
                                      .InternalName;
            if (header != "Country Other" && header != "Continent")
            {
                double num = Double.Parse(row[header].ToString());
                oListItem[internalName] = num;
            }
            else
            {
                oListItem[internalName] = row[header].ToString();
            }
        }
    }
    oListItem.Update();
//we are sending the data to the server after every 50 items for performance reasons
    if (++cnt % 50 == 0) context.ExecuteQuery();
}
context.ExecuteQuery();
//------------
After the code above is executed, we should be able to see the data in the SharePoint list.
Now, the next step is to create the modern page, add the pie-chart to it and show the Total cases per country on the chart.
This part of the code uses OfficeDevPnP CSOM library for easier handling of the modern pages. The library is included in SPCoder, so you don't have to download it yourself.
Now, the next step is to create the modern page, add the pie-chart to it and show the Total cases per country on the chart.
This part of the code uses OfficeDevPnP CSOM library for easier handling of the modern pages. The library is included in SPCoder, so you don't have to download it yourself.
using OfficeDevPnP.Core.Pages;

// get a list of possible client side web parts that can be added
ClientSidePage p = new ClientSidePage(context);
var components = p.AvailableClientSideComponents();

var myWebPart = components.Where(s => s.ComponentType == 1 && s.Manifest.Contains("QuickChartWebPart"))
                          .FirstOrDefault();
CanvasSection cs = new CanvasSection(p, CanvasSectionTemplate.OneColumn, 5);
p.AddSection(cs);

ClientSideWebPart helloWp = new ClientSideWebPart(myWebPart) { Order = 10 };
helloWp.PropertiesJson =
@"{'data':[{'id':'7CFFD4B0-436E-430D-94C5-A4F9D22DB3FE','label':'','value':'','valueNumber':0}],'type':1,
'isInitialState':false,'dataSourceType':1,'listItemOrderBy':0,
'selectedListId':'" + list.Id.ToString() + "','selectedLabelFieldName':'Title',
'selectedValueFieldName':'TotalCases','xAxisLabel':'','yAxisLabel':''}";

p.AddControl(helloWp, cs.Columns[0]);
//This will save the page to SitePages library
p.PageTitle = "Corona Stats page 2";
p.LayoutType = ClientSidePageLayoutType.Article;
p.Save("CoronaStats2.aspx");
After this code runs, you should check the SitePages library on your SharePoint online site and look for the CoronaStats2.aspx page. If everything worked fine the page should contain the pie chart with the total corona cases per country.


